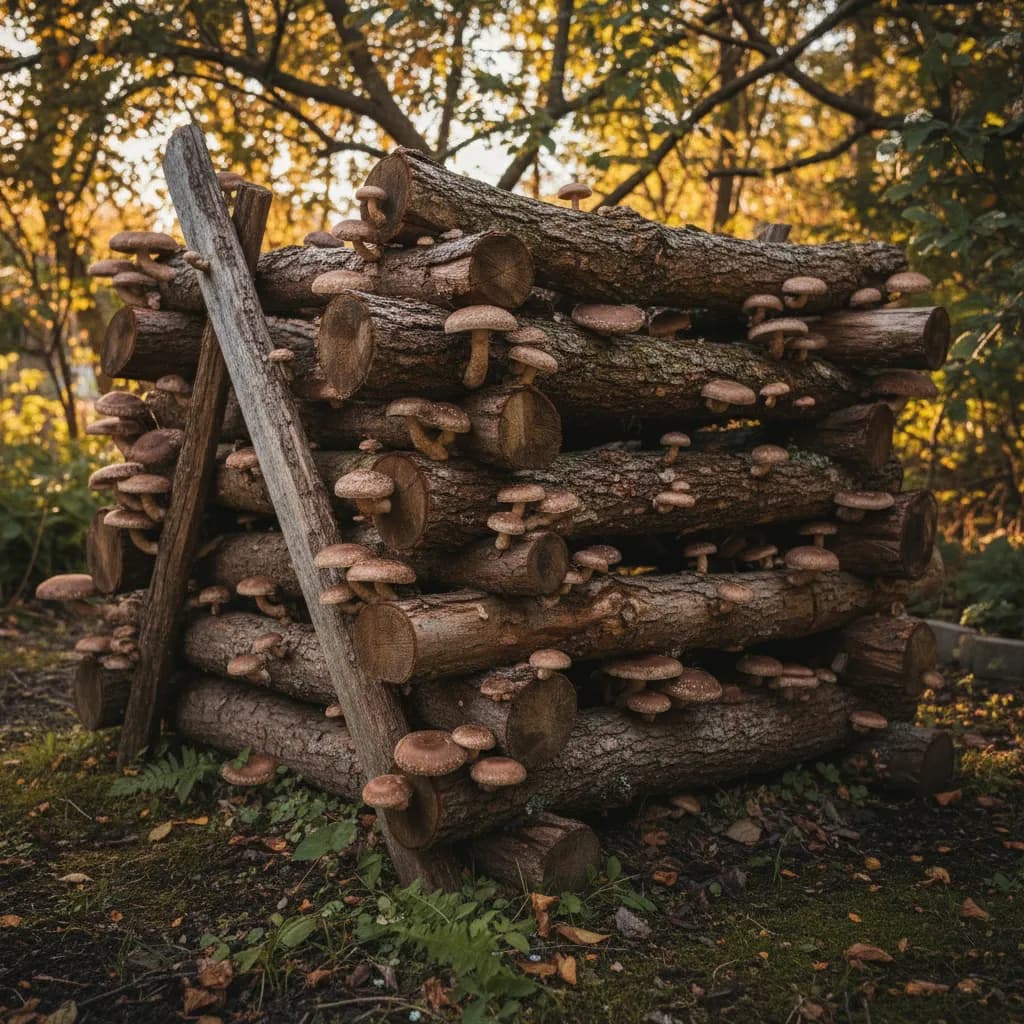
Long before anyone was growing mushrooms on sawdust blocks in climate-controlled rooms, people were growing them on logs. It's the oldest method of mushroom cultivation in the world — Japanese farmers have been growing shiitake on oak logs for over a thousand years — and it remains one of the most rewarding ways to produce mushrooms at home.
Log cultivation is slow. You won't harvest anything for 6-18 months after inoculation, and some species take even longer. But what you get in return is years of production from a single log, mushrooms with exceptional flavour and texture that indoor-grown specimens rarely match, and a setup that requires almost no equipment, no electricity, and minimal ongoing maintenance.
If you have access to hardwood trees and a shady spot in your yard, log cultivation is one of the most satisfying mushroom growing projects you can take on.
How Log Cultivation Works
The basic concept is simple. You introduce mushroom mycelium into a freshly cut hardwood log using plug spawn (wooden dowels colonized with mycelium) or sawdust spawn. The mycelium colonizes the entire log over a period of months, breaking down the wood and drawing nutrients from it. Once the log is fully colonized, environmental triggers — primarily rain and temperature changes — cause the mushroom to fruit.
A well-inoculated log will produce mushrooms for 3-8 years, depending on the species, the log size, and the climate. A single log typically produces 2-4 flushes per year, usually in spring and fall when conditions are right.
Log Selection
Getting the log right is the foundation of successful log cultivation. Every detail matters.
Species of Tree
Not all wood is equal. Different mushroom species have preferences, and using the wrong tree species can result in poor colonization or no fruiting at all.
Oak (red and white) — The gold standard for shiitake, and excellent for most other log-cultivated species. Dense, durable, and packed with nutrients. Oak logs produce mushrooms for the longest period — up to 8 years. Red oak is slightly preferred over white oak because the bark is more porous, but both work well.
Maple (sugar and red) — Excellent for oyster mushrooms and lion's mane. Colonizes faster than oak but doesn't last as long (3-5 years of production). Sugar maple is widely available across eastern Canada.
Birch (yellow and white) — Good for oyster mushrooms and some shiitake strains. Colonizes quickly but decomposes faster than oak or maple. White birch is abundant across the Canadian boreal. Birch is also the host tree for wild chaga, though chaga is not cultivated using the plug spawn method described here.
Beech — Excellent for shiitake and lion's mane. Dense hardwood with good nutrient content. American beech is common in southern Ontario and Quebec.
Ironwood (hop hornbeam) — Dense and slow to decompose, making it excellent for long-term production. Works well with shiitake.
Poplar and aspen — Excellent for oyster mushrooms. These softer hardwoods colonize very quickly (sometimes producing mushrooms in as little as 6 months) but don't last as long — 2-3 years of production. Abundant across Canada.
Avoid: Conifers (pine, spruce, cedar, fir) — most gourmet mushroom species cannot colonize coniferous wood. Black walnut — contains juglone, which inhibits fungal growth. Any wood that has been chemically treated. Fruit trees are generally fine but not ideal.
Diameter
Ideal: 10-20 cm (4-8 inches) in diameter. This is the sweet spot. Logs this size are heavy enough to retain moisture but light enough to handle. They colonize within a reasonable timeframe and produce for several years.
Smaller logs (under 10 cm) dry out too quickly and produce fewer mushrooms. Larger logs (over 25 cm) take much longer to colonize — sometimes 18+ months — and are very heavy to move. If you have larger-diameter wood available, consider the totem method instead (covered below).
Length
Cut logs to 90-120 cm (3-4 feet). This is a practical size for handling, stacking, and soaking. Longer logs are unwieldy; shorter logs dry out faster.
Timing of Harvest
Cut logs during dormancy — late fall through early spring, before sap flows. In most of Canada, this means November through March. Dormant-season wood has the highest sugar and starch content (stored nutrients that the mycelium will feed on) and the lowest water content.
Use the logs within 2-6 weeks of cutting. Freshly cut wood contains natural antifungal compounds that inhibit colonization by competing organisms. These compounds break down over the first few weeks. If you inoculate immediately after cutting, the log's own defences may slow colonization. If you wait too long (more than 2-3 months), competing wild fungi will colonize the log before your plug spawn has a chance.
The ideal window is 2-4 weeks after cutting. Store logs off the ground in a shaded area while you wait.
Bark Integrity
The bark must be intact. Bark is the log's moisture barrier. It keeps water in and competing organisms out during the critical colonization period. Logs with damaged, peeling, or missing bark dry out quickly and are vulnerable to contamination. Handle logs carefully and avoid dragging them across rough ground.
Plug Spawn Inoculation: Step by Step
Plug spawn is the standard method for home-scale log inoculation. Each plug is a short hardwood dowel that's been colonized with mushroom mycelium. You drill holes in the log, tap in the plugs, and seal them with wax.
Materials
- Freshly cut hardwood logs (2-6 weeks old)
- Plug spawn — approximately 50 plugs per log (for a 10-15 cm diameter, 100 cm long log)
- A drill with a 5/16" (8 mm) plug spawn drill bit — a high-speed drill bit works, but a specialized plug spawn bit with a depth stop is worth the investment
- A hammer or rubber mallet
- Cheese wax, beeswax pellets, or food-grade paraffin wax
- A small pot or wax melter for melting wax
- A foam brush or dauber for applying wax
North Spore 8.5mm Plug Spawn Drill Bit
Purpose-built for mushroom log inoculation with a built-in depth stop. Drills perfectly sized holes for plug spawn every time, without going too deep.
View on Amazon.ca →When you buy through our links, it supports our mycology research at no extra cost to you.
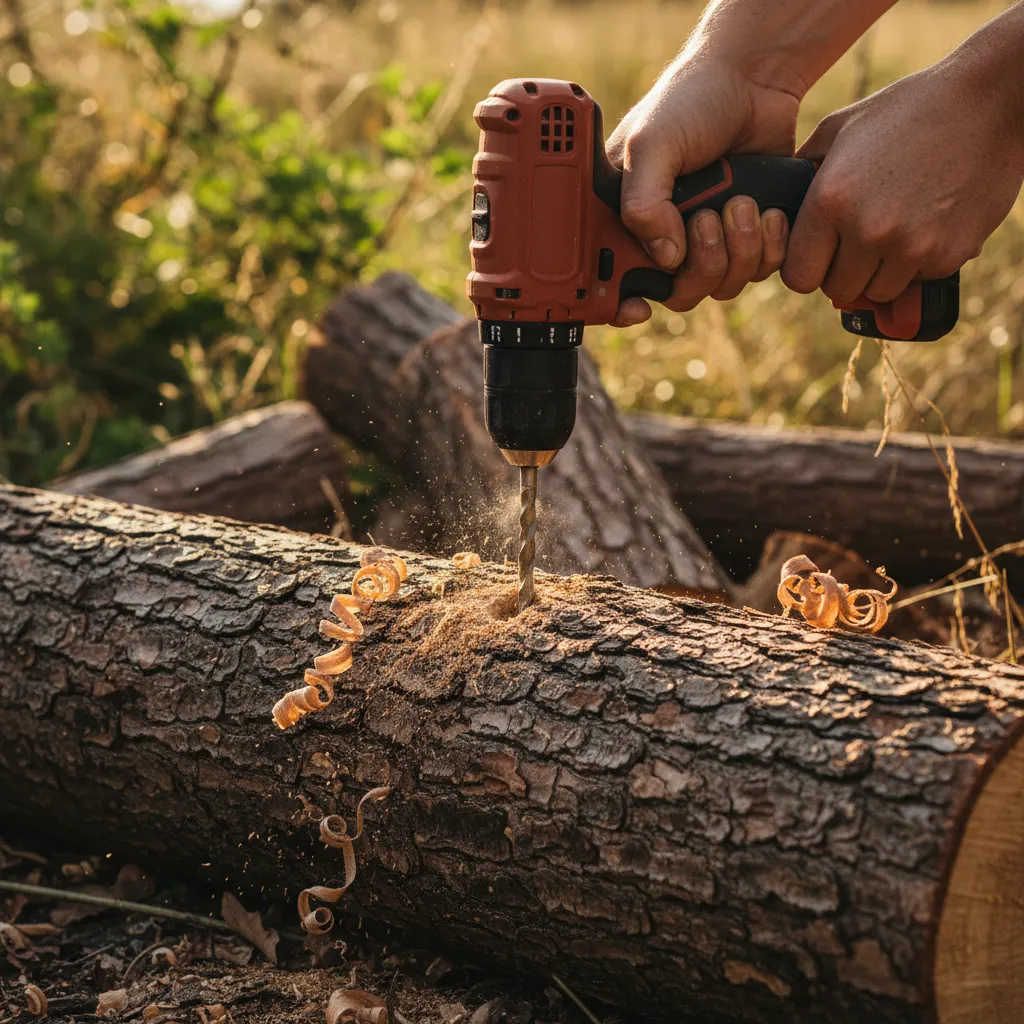
Step 1: Drill the Holes
Create a diamond pattern of holes across the entire log surface:
- Drill holes approximately 2.5-4 cm (1-1.5 inches) deep
- Space holes 15 cm (6 inches) apart along the length of the log
- Space rows 5-7 cm (2-3 inches) apart around the circumference
- Offset each row so the holes form a diamond (zigzag) pattern rather than straight lines
- A 10 cm x 100 cm log will need approximately 30-50 holes
Don't skip the ends of the log — drill a ring of holes about 5 cm from each end. The end grain is where moisture loss is greatest and where competing fungi most commonly enter.
Step 2: Insert the Plugs
Immediately after drilling (don't let the holes dry out), tap a plug spawn dowel into each hole using a hammer or rubber mallet. The plug should sit flush with or slightly below the bark surface. Don't leave plugs protruding — they'll dry out and won't be sealed properly by wax.
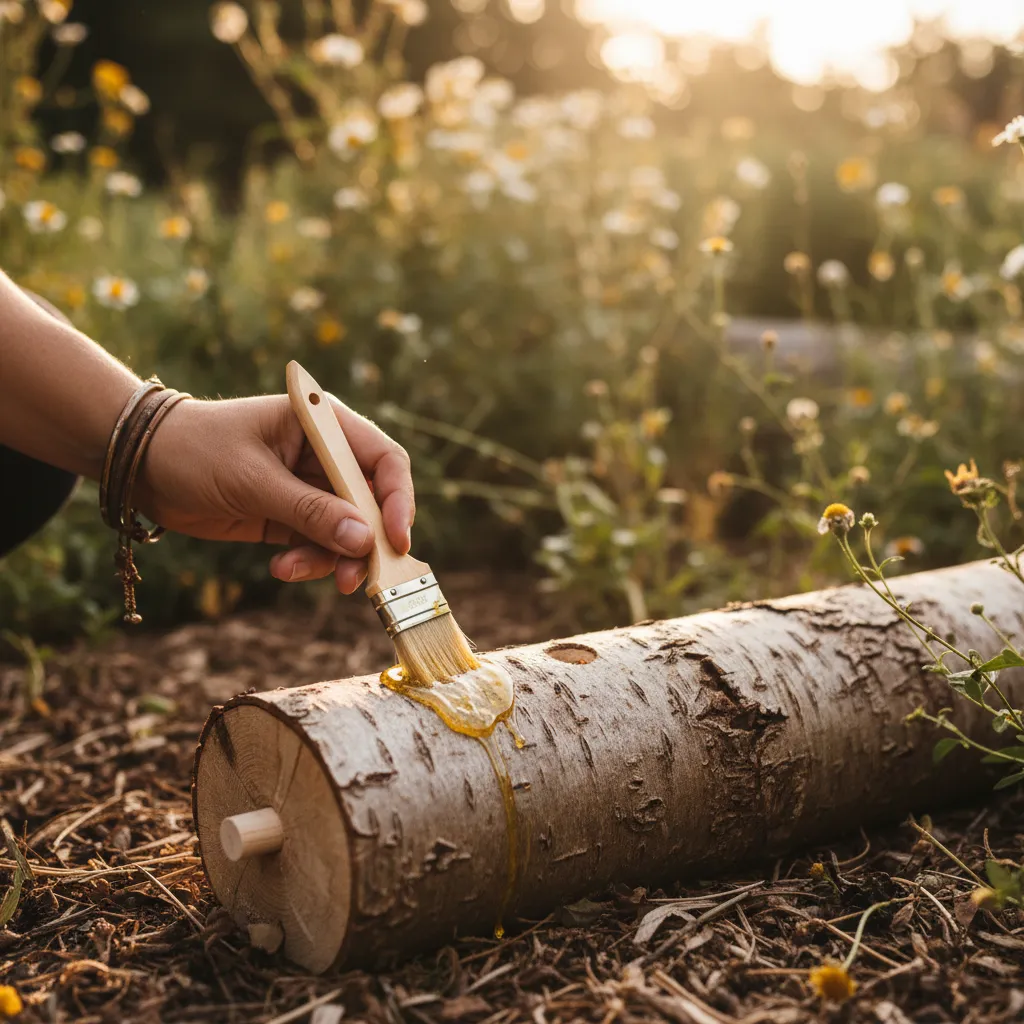
Step 3: Seal with Wax
Melt your sealing wax in a small pot or electric wax melter. Using a foam brush or dauber, apply a layer of melted wax over each plug, completely covering the hole. The wax serves two purposes: it locks in moisture around the plug, and it prevents competing organisms from entering through the drill hole.
Also seal the ends of the log with wax, and any spots where the bark is damaged or missing.
Wax options:
- Cheese wax is the most common choice — it stays pliable and doesn't crack in cold weather. Available from cheesemaking suppliers.
- Beeswax works well but can be brittle in Canadian winters.
- Food-grade paraffin is inexpensive and easy to find but cracks more readily than cheese wax.
Step 4: Incubate (The Long Wait)
This is where patience comes in. The inoculated logs need to sit in a shaded, humid location while the mycelium colonizes the interior. This period is called the "spawn run."
Placement: Stack logs in a shady area — under trees, on the north side of a building, or under a tarp that allows airflow. Logs should be off the ground (use pallets, rails, or other logs as supports). Ground contact promotes contamination from soil organisms.
Moisture: The logs need to stay moist. In dry weather, water them with a sprinkler or hose for 10-15 minutes once or twice a week. In a typical Canadian forest setting, natural rainfall is often sufficient, but summer droughts can dry logs out dangerously.
Timeline: Colonization takes 6-18 months depending on species, log species, diameter, and climate:
- Oyster mushrooms on poplar: 6-9 months
- Shiitake on oak: 9-14 months
- Lion's mane on maple: 9-12 months
You'll know colonization is progressing when you see white mycelium visible at the ends of the log or around the wax-sealed plug holes. Full colonization means the mycelium has permeated the entire interior of the log.
The Totem Method
Totems are an alternative to traditional log inoculation that works well with larger-diameter wood and is even simpler than plug spawn.
How It Works
Instead of drilling holes and inserting plugs, you cut a log into short rounds (15-20 cm / 6-8 inches thick), sandwich sawdust spawn between the rounds, and stack them back into a vertical column (totem).
Step by Step
- Cut fresh hardwood logs into rounds 15-20 cm thick.
- On a clean surface, place the bottom round cut-side up.
- Spread a 1-2 cm layer of sawdust spawn evenly across the cut surface.
- Stack the next round on top, cut-side down, sandwiching the spawn.
- Repeat for 3-4 rounds, adding spawn between each layer.
- Cap the top with a thin round or a piece of bark to reduce moisture loss.
- Place the totem in a shady, humid location directly on the ground (totems benefit from ground contact, unlike plug spawn logs).
- Water periodically during dry weather.
Advantages of Totems
- No drilling, no wax, no special tools. Just a chainsaw to cut rounds and sawdust spawn.
- Uses larger-diameter wood that would take too long to colonize with plug spawn.
- Faster colonization. The large cut surfaces exposed to spawn colonize quickly compared to the small plug holes.
- Works with stumps. You can inoculate fresh stumps in-place by cutting a round off the top, spreading spawn, and placing the round back.
Disadvantages
- Shorter lifespan. Totems decompose faster than intact logs (2-3 years vs. 4-8 years).
- Ground contact means more competition from soil organisms.
- Less portable than standard logs.
The Stump Method
If you've recently had a tree cut down, the stump is a ready-made mushroom substrate.
- Cut the stump fresh — or catch it within 2-4 weeks of the tree being felled.
- Drill holes in the top and sides of the stump, following the same pattern as plug spawn inoculation.
- Insert plug spawn and seal with wax.
- Wait. Stumps are large and take longer to colonize — 12-24 months is typical.
Stumps can produce mushrooms for many years, especially large oak or maple stumps. They're also a practical way to speed up stump decomposition if you want the stump to break down eventually.
Best Species for Log Cultivation
Shiitake (Lentinula edodes)
The classic log mushroom. Shiitake has been grown on logs for centuries and is the species most associated with log cultivation. It fruits in spring and fall when temperatures are 10-21°C (50-70°F) and rainfall triggers fruiting. Shiitake logs can produce for 4-8 years on oak.
Best logs: Oak (red or white), beech, ironwood. Colonization time: 9-14 months. Fruiting trigger: Soaking in cold water for 24 hours (the "force fruiting" technique) or natural rain events.
Force fruiting is a powerful technique: submerge the fully colonized log in cold water (a stock tank, kiddie pool, or stream) for 24 hours, then stand it upright in a shaded area. Mushrooms will appear within 5-10 days. You can force fruit shiitake logs every 6-8 weeks during the growing season.
Learn more about shiitake cultivation in our how to grow shiitake mushrooms guide.
Oyster Mushrooms (Pleurotus species)
Oyster mushrooms are aggressive colonizers that do well on a wide range of log species. They fruit at various temperatures depending on the variety — Blue Oyster likes it cool (10-21°C / 50-70°F), while Pink Oyster needs warmth (18-30°C / 64-86°F).
Best logs: Poplar, aspen, birch, maple, cottonwood. Oysters prefer softer hardwoods. Colonization time: 6-9 months on poplar, longer on harder species. Fruiting trigger: Rain and temperature fluctuations. Oysters on logs tend to fruit prolifically in fall.
For a complete oyster growing guide, see how to grow oyster mushrooms.
Lion's Mane (Hericium erinaceus)
Lion's mane grows on logs in the wild across Canadian hardwood forests, and it adapts well to log cultivation. The large, white, cascading fruit bodies are dramatic growing from the side of a log.
Best logs: Maple, beech, oak. Sugar maple is ideal. Colonization time: 9-12 months. Fruiting trigger: Cool temperatures and rain. Fruits in fall, sometimes in spring.
Lion's mane needs slightly more humidity than shiitake during fruiting — placing logs in a naturally humid location (near a stream, under dense canopy, or in a low-lying area) helps.
Nameko (Pholiota nameko)
A lesser-known species in Canada but excellent for log cultivation. Nameko produces small, glossy, amber-coloured mushrooms with a slippery coating that's prized in Japanese cuisine for miso soup and nabe (hot pot).
Best logs: Beech, maple, birch. Colonization time: 12-18 months. Fruiting trigger: Cool, wet fall weather.
Timeline: What to Expect
Here's a realistic timeline for a shiitake-on-oak log project started in early spring in southern Ontario or a comparable Canadian climate zone.
| Time | Activity |
|---|---|
| February-March | Cut logs during late dormancy |
| March-April | Inoculate logs after 2-4 weeks of rest |
| April - following spring | Spawn run (colonization). Keep logs moist and shaded. |
| May-June (Year 2) | First natural fruiting may occur after spring rains |
| Year 2, summer | Begin force fruiting every 6-8 weeks by soaking logs |
| Years 2-6+ | Continued spring and fall production. Yields peak in years 2-4, then gradually decline as the log decomposes. |
The first 12-18 months require patience — you're investing time and care into logs that aren't producing anything visible. But once they start fruiting, the payoff is years of production with minimal ongoing work.
Canadian Climate Considerations
Log cultivation works across most of Canada, but our climate presents some specific challenges.
Winter Protection
Mushroom mycelium is remarkably cold-hardy — it survives Canadian winters without protection in most cases. The mycelium goes dormant when temperatures drop below freezing and resumes growth in spring. However, extreme cold combined with drying winter winds can damage exposed logs.
In most of southern Canada (zones 4-6): No special winter protection needed. Leave logs in their shaded location. Snow cover actually insulates logs and maintains moisture.
In colder zones (2-3) or exposed locations: Consider covering log stacks with a loose tarp, burlap, or evergreen boughs to reduce wind exposure and moisture loss. Don't seal them in plastic — they need airflow.
Freeze-thaw cycles can crack wax seals on plug spawn logs. Check and re-wax any exposed plugs in early spring before the growing season begins.
Spring Soaking
After a Canadian winter, logs may be significantly dried out. Before the growing season, soak shiitake logs for 24-48 hours in cold water to rehydrate them. This doubles as a force-fruiting trigger — you'll often get your first spring flush within a week of soaking.
Even logs that aren't ready for force-fruiting benefit from a spring soak. Rehydration after winter ensures the mycelium can resume active growth.
Summer Drought
Canadian summers can be surprisingly dry, especially in southern Ontario and the Prairies. During extended dry periods, water your logs with a sprinkler for 15-20 minutes, 2-3 times per week. Logs that dry out completely may not recover — keeping them in a shady, naturally humid location is the best insurance.
Fall Harvesting
Fall is the prime fruiting season for most log-cultivated species in Canada. Cooler temperatures, rain, and shortening days trigger fruiting in shiitake, oyster, and lion's mane. Plan to check your logs regularly from September through November — mushrooms can appear and mature quickly.
Troubleshooting
No Fruiting After 18+ Months
Possible causes:
- Logs are too dry. Test by weighing — a well-hydrated log is surprisingly heavy. Soak for 24-48 hours.
- Logs weren't fully colonized. Check the ends for white mycelium. If you don't see it, the spawn run may still be in progress.
- Logs were cut from the wrong tree species, or the wood was too old when inoculated.
- Environmental conditions are wrong — temperature out of range, or no rain events to trigger fruiting.
Green Mold on Logs
Some Trichoderma on the bark surface is normal and usually not a problem for established logs. If green mold is growing directly out of the plug holes, it means the mycelium hasn't successfully colonized that area and a competitor has moved in. There's little you can do for individual plugs that are lost to contamination, but a log with a good overall colonization rate can tolerate some losses.
Bark Falling Off
Once the bark starts separating from the log, the log is drying out too quickly and approaching the end of its productive life. Bark loss accelerates moisture loss, which reduces or eliminates fruiting. Logs with significant bark loss may produce one or two more flushes but are nearing retirement.
Log cultivation is mushroom growing in its most elemental form — a partnership between fungus and wood that produces food for years with minimal input. It's slower than indoor methods, but the flavour of a shiitake that's spent 18 months developing in an oak log is genuinely different from one grown on a sawdust block in four weeks. Both are good. The log-grown version is special.
Start with a few logs, a bag of plug spawn, and a shady corner of your yard. In a year or so, you'll have your first harvest — and then you'll have harvests for years to come.
Browse our plug spawn and grain spawn for shiitake, oyster, lion's mane, and other log-friendly species, or read the complete guide to growing mushrooms for an overview of all cultivation methods. For an even easier outdoor option that does not require drilling or log sourcing, try wine cap mushrooms in a garden bed — just wood chips and spawn.
Need help with your grow? Dr. MycoThumb is our free AI growing assistant — ask about substrates, contamination, fruiting conditions, or any cultivation question. Available 24/7 in the chat bubble at the bottom-right of every page.