Reishi (Ganoderma lucidum) is one of the most visually striking mushrooms you can grow at home. Known as the "mushroom of immortality" in traditional Chinese medicine and "lingzhi" in Mandarin, reishi has been used for over 2,000 years across East Asia. With its glossy, lacquered appearance ranging from deep red-brown to near-black, growing reishi is as much an art form as it is a cultivation project.
What makes reishi particularly appealing for home growers in Canada is its forgiving nature. Unlike oyster mushrooms that demand precise harvest timing or lion's mane that needs careful humidity management, reishi grows slowly and deliberately. You have weeks — not hours — to make decisions about form, harvest timing, and environmental adjustments. It is an excellent species for cultivators who want a low-maintenance but deeply rewarding project.
In this guide, you will learn how to grow reishi in both its antler and conk forms, from inoculation through to harvest and processing.
Understanding Antler vs Conk Form
One of the most fascinating aspects of reishi cultivation is that you can control the mushroom's final shape by adjusting a single environmental variable: carbon dioxide concentration.
Antler Form (High CO2)
When reishi grows in an environment with elevated CO2 levels (above 1,500-2,000 ppm), the fruiting body elongates into finger-like projections called "antlers." These antler formations are dense, woody, and lack the flat cap characteristic of wild reishi. The antler form develops because the mushroom is searching for fresh air — it keeps reaching upward, branching and splitting as it grows.
Antler reishi is popular with growers because:
- It requires less environmental control (simply keep the bag mostly sealed)
- The formation is sculptural and unique — no two antlers look alike
- It produces dense biomass with concentrated compounds
- It is easier for beginners since you do not need a dedicated fruiting chamber
To grow antler form, simply leave your colonised block inside its filter-patch bag or poke only a small hole. The restricted airflow naturally elevates CO2 around the developing fruit body. You can start with a reishi antler agar culture specifically isolated for vigorous antler production.
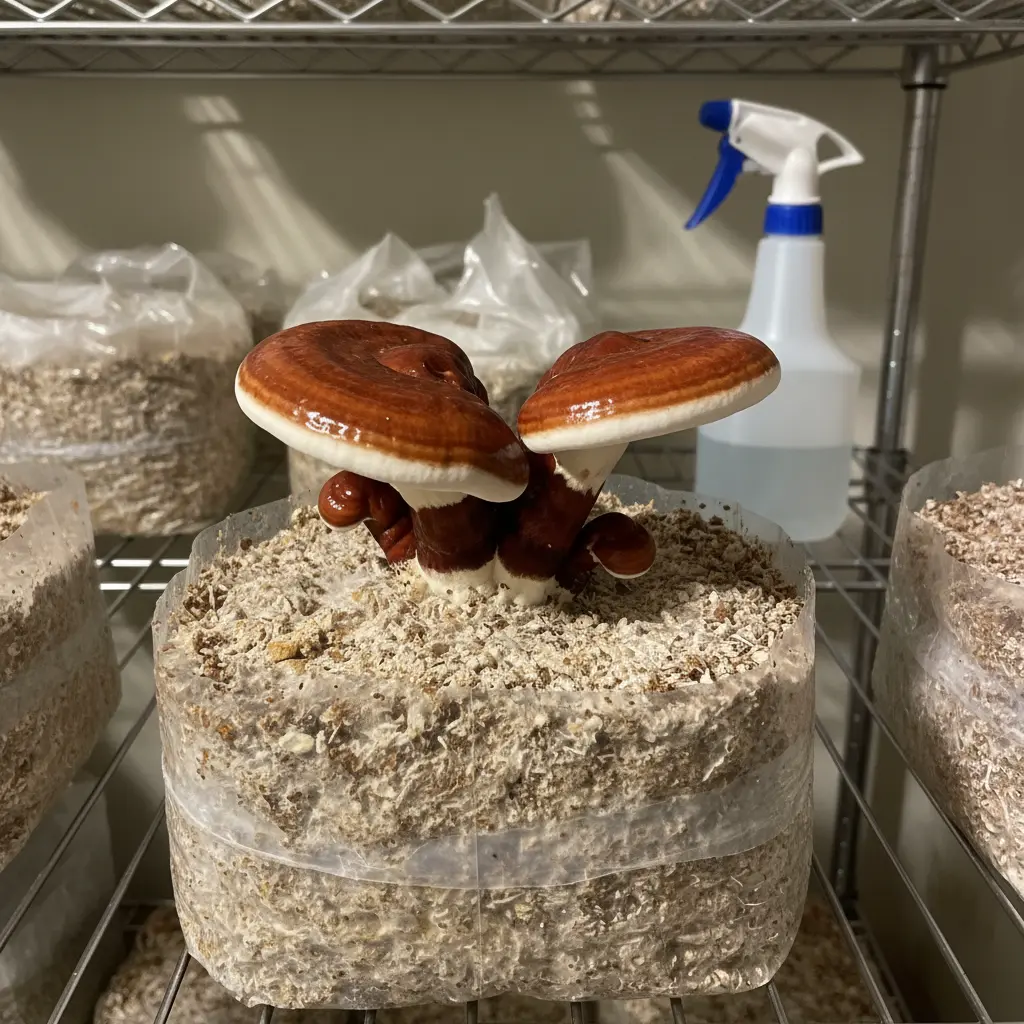
Conk Form (Low CO2, High Fresh Air)
When reishi receives abundant fresh air exchange (CO2 below 800 ppm), it develops the classic shelf-like conk with a glossy, varnished cap. This is the form most people recognise from photographs and traditional illustrations. The cap starts white at its growing edge, gradually developing the characteristic red-brown lacquer as it matures.
Conk form requires:
- A fruiting chamber or tent with consistent fresh air exchange
- Higher humidity (85-95%) to prevent the cap from cracking
- More attention to environmental consistency
The conk form is visually dramatic and produces the spore-releasing cap that many growers prefer. If you want to grow conk-style reishi, a reishi conk agar culture gives you genetics selected for broad, well-formed caps.
Growing Conditions for Reishi
Reishi is a warm-weather fruiting species compared to many gourmet mushrooms. Here are the key parameters:
| Parameter | Colonisation | Fruiting |
|---|---|---|
| Temperature | 25-30°C | 24-30°C |
| Humidity | N/A (sealed) | 85-95% |
| Light | Not required | Indirect/ambient |
| Fresh Air | Minimal | Low (antler) or High (conk) |
| Duration | 14-30 days | 30-90 days |
Unlike oyster mushrooms that fruit best at cooler temperatures, reishi thrives in summer heat. Canadian growers can take advantage of warm summer months (June through August) for fruiting without supplemental heating. A south-facing room, garage, or greenhouse works well during the growing season.
Reishi also tolerates a wider humidity range than many species. While 90%+ is ideal for conk formation, antler-form reishi will develop perfectly well at 70-80% humidity since the bag itself maintains the microclimate.
Substrate Options
Reishi is a white-rot fungus that naturally decomposes hardwood. Your substrate choices should reflect this preference for lignin-rich materials. For a deeper understanding of substrate science, see our complete mushroom substrate guide.
Hardwood Sawdust + Wheat Bran (Recommended)
The standard commercial substrate for reishi is supplemented hardwood sawdust:
- 78% hardwood sawdust (oak, maple, or beech are ideal)
- 20% wheat bran (provides nitrogen for faster colonisation)
- 2% gypsum (calcium sulphate — buffers pH and improves structure)
- Moisture content: 60-65% (squeeze test — a few drops should emerge)
This mixture provides the ideal carbon-to-nitrogen ratio for aggressive reishi colonisation. Oak sawdust is particularly effective as reishi has a natural affinity for oak in the wild.
Hardwood Fuel Pellets + Bran
A convenient alternative for home growers who cannot source fresh sawdust:
- 4 cups hardwood fuel pellets (broken down with boiling water)
- 1 cup wheat bran
- Water to 60-65% moisture
Hardwood fuel pellets are available at most hardware stores across Canada. They are kiln-dried and compressed, which means they are already partially pasteurised. Soak them in boiling water, let them cool and break apart, then mix in your bran.
Log Cultivation
Reishi can also be grown on hardwood logs using the traditional plug-spawn method:
- Species: Oak, maple, sweet gum, or elm (10-15 cm diameter, 30-90 cm length)
- Timing: Inoculate in spring after last frost
- Method: Drill holes every 10-15 cm, insert spawn plugs, seal with cheese wax
- Timeline: 6-18 months to first fruiting
Log cultivation is slower but produces reishi year after year from the same log. It is well-suited to Canadian growers with access to freshly cut hardwood. Logs should be cut from living trees in late winter when sugar content is highest.
Step-by-Step Growing Guide
Step 1: Prepare Your Substrate
Mix your chosen substrate recipe and hydrate to 60-65% moisture content. For the sawdust-bran recipe, combine all dry ingredients thoroughly before adding water. The mixture should hold together when squeezed, with only a drop or two of water emerging between your fingers.
Load the substrate into autoclavable grow bags (with filter patches) or mason jars. Fill bags to approximately 2.5-3 kg wet weight each. Fold the top of the bag over and secure with an impulse sealer or fold-and-tape method.
Step 2: Sterilise the Substrate
Reishi substrate must be fully sterilised (not just pasteurised) due to the high nutrient content from the wheat bran supplement. Sterilise at 15 PSI for 90-120 minutes in a pressure cooker or autoclave.
Allow bags to cool completely to room temperature before inoculation — this takes 8-12 hours. Do not rush this step. Opening hot bags invites contamination. For detailed sterilisation protocols, see our guide on how to sterilise mushroom substrate.
Step 3: Inoculate with Reishi Culture
Working in front of a laminar flow hood or in a still-air box, introduce your reishi culture to the sterilised substrate. You can use:
- Grain spawn (fastest colonisation — 5-10% spawn rate by weight)
- Liquid culture (economical for multiple bags — 10-20 mL per bag)
- Agar wedge (slowest but useful for isolating genetics)
For larger operations, reishi antler commercial liquid culture (200 mL) provides enough inoculant for 10-20 bags depending on your spawn rate.
Inject liquid culture through the filter patch or a self-healing injection port. For grain spawn, open the bag in your clean environment, add spawn to the top of the substrate, and reseal.
Step 4: Colonisation Phase
Place inoculated bags in a warm, dark location at 25-30°C. Reishi colonisation is unmistakable — the mycelium appears bright white and aggressive, often developing a thick, almost rubbery mat across the substrate surface.
During colonisation:
- Do not open or disturb the bags
- Check weekly for signs of contamination (green, black, or orange patches)
- Expect full colonisation in 14-30 days depending on spawn rate and temperature
- The substrate will often develop a reddish-brown discolouration as the reishi produces melanin compounds — this is normal and indicates healthy colonisation
You will know colonisation is complete when the entire substrate surface is covered in thick white mycelium, and the bag feels firm and consolidated.
Step 5: Initiate Fruiting
This is where you decide: antler or conk?
For antler form: Simply cut a small X (2-3 cm) in the bag and leave it in a warm location. The restricted fresh air will naturally produce antler formations. You can also leave the bag completely sealed — the mushroom will eventually push through the filter patch or find weak points in the bag. Many growers cut a single small slit and allow the antlers to emerge from that opening.
For conk form: Remove the block from the bag entirely or cut a large opening (10+ cm). Place in a fruiting chamber with:
- Humidity at 85-95% (mist 2-3 times daily or use an ultrasonic humidifier)
- Fresh air exchange every 4-6 hours (fan on a timer or passive vents)
- Indirect light (a window or low-wattage LED on a 12/12 cycle)
- Temperature maintained at 24-30°C
The first signs of fruiting appear as white bumps or "primordia" pushing through the substrate surface or out of your cut openings. These will develop over the following weeks into either antlers or conks depending on your CO2 management.
Step 6: Monitor Development
Reishi is a slow grower compared to oyster mushrooms or shiitake. Expect:
- Week 1-2: Primordia formation (white bumps)
- Week 2-4: Elongation of antlers or initial cap formation
- Week 4-8: Continued growth and lacquer development
- Week 6-12: Maturation and spore production (conk form)
During this period, maintain consistent conditions. Reishi is tolerant of brief fluctuations, but significant temperature drops or extended dry periods can cause the growing edge to abort or crack.
The growing edge of a conk will remain white — this is the active growth zone. As the cap matures behind the edge, it develops the characteristic red-brown lacquered finish. A healthy conk adds 2-5 mm of new growth per day under optimal conditions.
Harvesting Reishi
When to Harvest
Reishi harvest timing depends on your form and goals:
Antler form: Harvest when the antlers reach your desired size and begin to harden. There is no single "correct" moment — longer growth simply means larger antlers. Many growers harvest when antlers reach 15-25 cm in length.
Conk form: The classic harvest indicator is when the white growing edge disappears and the entire cap surface develops the lacquered finish. At this point, the mushroom has stopped growing and is beginning to release spores. If you see a fine brown dust collecting around the cap — those are spores, and the mushroom is fully mature.
Additional harvest indicators:
- The underside (pore surface) has turned from white to cream or light brown
- The entire fruit body feels firm and woody when gently pressed
- Spore release has begun (brown dust on surrounding surfaces)
How to Harvest
Use a sharp knife or pruning shears to cut the fruit body at its base where it connects to the substrate block. Reishi is woody and tough — you may need more force than you expect compared to softer gourmet mushrooms.
After the first harvest, many blocks will produce a second or even third flush. Soak the block in cold water for 12-24 hours after harvest, then return it to fruiting conditions. Subsequent flushes are typically smaller but still worthwhile.
Drying and Processing
Fresh reishi is almost never consumed directly due to its extremely bitter taste and woody texture. Proper drying and processing are essential.
Drying
- Slice fresh reishi into thin strips (3-5 mm thick) using a sharp knife or bandsaw for larger conks
- Arrange slices in a single layer on dehydrator trays
- Dry at 40-50°C for 8-16 hours until completely crisp and brittle
- Slices should snap cleanly — any flexibility indicates retained moisture
- Store dried slices in airtight containers away from light and moisture
Alternatively, you can dry whole antler pieces without slicing. These take longer (24-48 hours) but make attractive display pieces.
Processing Options
Dried reishi can be:
- Ground to powder — use a blender or coffee grinder. The powder can be added to coffee, smoothies, or capsules. For a ready-made option, try our reishi powder (60g).
- Simmered as tea — steep dried slices in hot water for 30-60 minutes. The resulting tea is deeply bitter with an earthy flavour.
- Double-extracted — combine hot water extraction and alcohol extraction for a full-spectrum tincture.
Storage
Properly dried reishi stores for 1-2 years in airtight containers at room temperature. Vacuum sealing extends shelf life further. Store away from direct sunlight to preserve colour and prevent degradation.
Common Problems and Solutions
Contamination During Colonisation
Symptoms: Green (Trichoderma), black, or orange patches appearing on the substrate.
Solution: Discard contaminated bags immediately — do not open them indoors. Review your sterilisation protocol and ensure bags are cooled completely before inoculation. Increase sterilisation time to 120 minutes if contamination is recurring.
Stalled Colonisation
Symptoms: Mycelium growth stops or slows dramatically after initial establishment.
Solution: Check temperature — reishi stalls below 20°C. Ensure bags are stored at 25-30°C. If only partial colonisation occurs after 6+ weeks, the culture may be too old or the substrate moisture may be off. Remake with fresh materials.
Cracking Caps (Conk Form)
Symptoms: The developing cap surface cracks or splits, especially at the growing edge.
Solution: Increase humidity immediately. Cracking indicates relative humidity dropping below 80%. Add additional misting or reduce ventilation slightly. Some surface cracking is cosmetic only and does not affect the mushroom's development.
No Fruiting After Full Colonisation
Symptoms: Block is fully colonised but produces no primordia after 2+ weeks of fruiting conditions.
Solution: Introduce a temperature drop of 5°C for 24-48 hours to trigger pinning. Ensure the block is receiving some indirect light. Some reishi strains are slower to initiate — patience is often the answer. Reishi can take 2-4 weeks to begin fruiting even under ideal conditions.
Weak or Thin Antlers
Symptoms: Antlers are spindly, pale, or collapse under their own weight.
Solution: Increase temperature to 27-30°C and ensure the substrate is well-supplemented. Weak antlers can indicate insufficient nutrition in the substrate or temperatures below the optimal range. Consider increasing wheat bran to 22-25% in your next batch.
Mould on Mature Fruit Bodies
Symptoms: White or green fuzzy growth on the surface of developing reishi.
Solution: Increase fresh air exchange. Stagnant air with high humidity creates conditions for surface moulds. Reishi's lacquered surface is naturally mould-resistant once mature, but developing fruit bodies are vulnerable in stagnant conditions.
FAQ
How long does it take to grow reishi mushrooms from start to finish?
The total timeline from inoculation to harvest is typically 8-16 weeks. Colonisation takes 2-4 weeks, and fruiting takes an additional 4-12 weeks depending on whether you are growing antler form (shorter) or conk form (longer). Log cultivation takes significantly longer — 6-18 months for first fruiting.
Can I grow reishi mushrooms outdoors in Canada?
Yes, but only during the warm months (June through September in most regions). Reishi needs consistent temperatures above 24°C for fruiting, which limits outdoor cultivation to summer. Log cultivation works well outdoors in southern Ontario, British Columbia, and other regions with warm summers. Place logs in a shaded, humid location and water during dry spells.
What is the difference between red reishi and other Ganoderma species?
Ganoderma lucidum (red reishi) is the most commonly cultivated species. G. tsugae (hemlock varnish shelf) grows on conifers and is native to Canadian forests. G. lingzhi is considered by some mycologists to be the true Asian species, with G. lucidum being the European equivalent. For home cultivation, cultures sold as G. lucidum are well-adapted to hardwood substrates and produce reliably.
Is it possible to grow both antler and conk form from the same culture?
Absolutely. The same genetics can produce either form — it is entirely determined by the CO2 concentration during fruiting. You can even transition a growing fruit body from antler to conk by increasing fresh air exchange partway through development. The antler will stop elongating and begin forming a cap at its tip, creating a hybrid "antler-conk" shape that many growers find aesthetically interesting.
How many harvests can I get from one substrate block?
Most supplemented sawdust blocks produce 1-3 flushes of reishi. The first flush is always the largest, with subsequent flushes yielding 30-50% less biomass each time. After the third flush, the substrate is generally spent. Log cultivation, by contrast, can produce annual flushes for 3-7 years depending on log size and species.
Getting Started with Reishi
Reishi is one of the most rewarding mushrooms to cultivate at home. Its slow growth gives you time to learn, its dramatic appearance provides visual interest throughout the growing process, and its long shelf life once dried means nothing goes to waste.
For Canadian growers, summer is the ideal season to start a reishi project. Begin with a quality culture — whether antler form or conk form — prepare your supplemented hardwood substrate, and enjoy the meditative process of watching these ancient fungi develop over the following weeks and months.
Need help with your grow? Dr. MycoThumb is our free AI growing assistant — ask about substrates, contamination, fruiting conditions, or any cultivation question. Available 24/7 in the chat bubble at the bottom-right of every page.