Chestnut mushrooms (Pholiota adiposa) are one of the most rewarding gourmet species you can grow at home. With their rich, nutty flavour and stunning golden-brown caps, they stand out at farmers markets and on dinner plates alike. Despite their incredible culinary appeal, chestnuts remain relatively unknown in Canada — which makes them a fantastic opportunity for home growers and small-scale farmers.
In this guide, we'll walk you through everything you need to know to successfully cultivate chestnut mushrooms, from choosing your substrate to harvesting picture-perfect clusters.
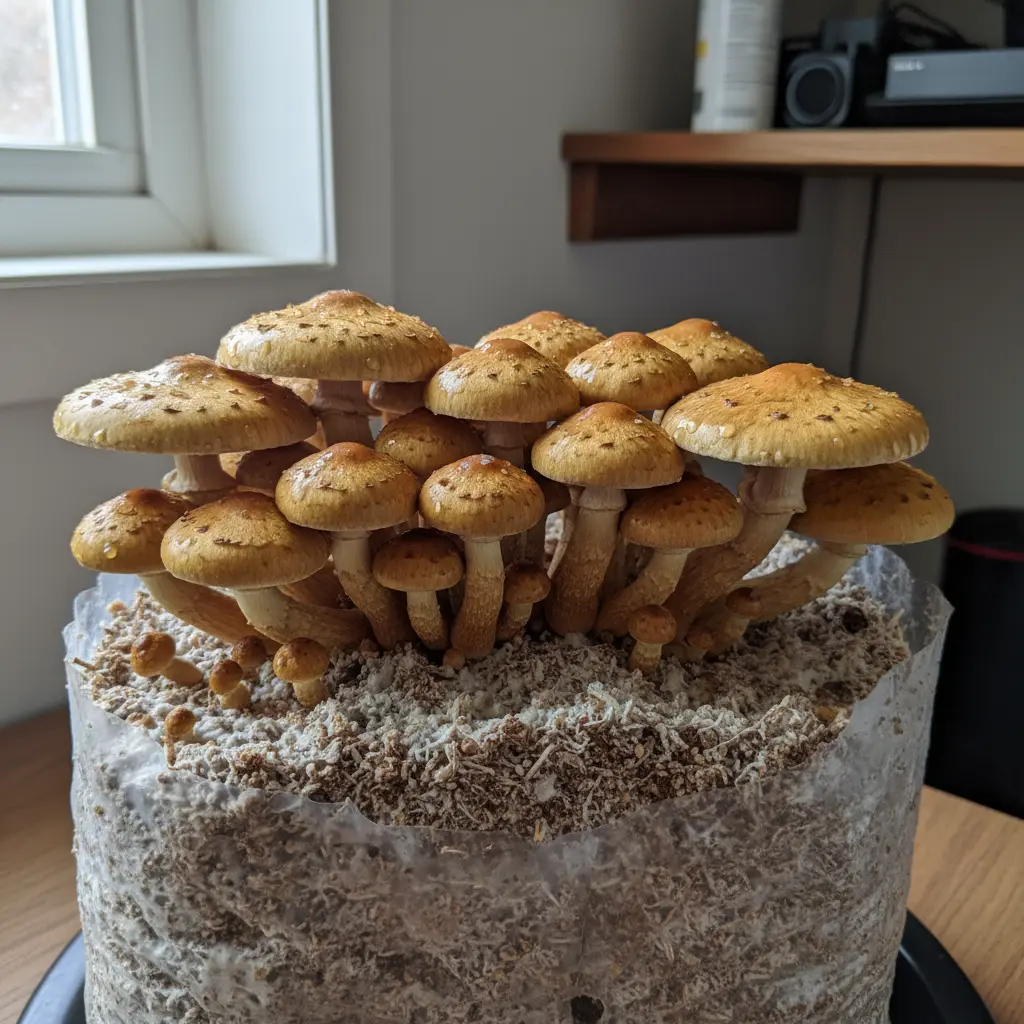
What Are Chestnut Mushrooms?
Chestnut mushrooms (Pholiota adiposa) are a wood-loving gourmet species native to temperate forests across North America, Europe, and Asia. In the wild, they fruit in dense clusters on hardwood logs and stumps, particularly beech, oak, and maple.
The caps range from 3 to 10 centimetres across and display a beautiful gradient from deep chestnut brown at the centre to golden-amber at the edges. Young caps are convex with slightly inrolled margins, flattening out as they mature. The stems are firm and pale, often with a slight ring zone where the partial veil detached.
Flavour Profile
What truly sets chestnut mushrooms apart is their flavour. They have a distinctly nutty, buttery taste that intensifies beautifully when cooked. Unlike oyster mushrooms, which can become rubbery if overcooked, chestnuts maintain a pleasant, meaty texture through extended cooking. The flavour has been compared to roasted hazelnuts with earthy undertones — making them a favourite among chefs who discover them.
Their texture is notably firmer than most cultivated mushrooms, which means they hold up well in stir-fries, roasts, and soups without becoming mushy. This firm texture also gives them an excellent shelf life compared to more delicate species.
Why Grow Chestnut Mushrooms?
A Market Gap in Canada
Walk into any Canadian grocery store and you'll find white button mushrooms, cremini, and perhaps some oysters or shiitake. Chestnut mushrooms are conspicuously absent from most retail shelves — yet customers who try them at farmers markets almost always come back for more.
This market gap creates a genuine opportunity. Chestnut mushrooms are one of the most profitable mushrooms for Canadian farmers market sellers, commanding premium prices of $18 to $25 per pound in many regions. Their visual appeal — those gorgeous amber clusters — draws customers to your table, and the unique flavour profile creates loyal repeat buyers.
Easy to Grow
Chestnuts are forgiving for beginners. They colonize substrate aggressively, which helps them outcompete contamination. They fruit reliably in a range of conditions and produce multiple flushes from a single block. If you've grown oyster mushrooms successfully, you're ready for chestnuts.
Excellent Yields
A well-prepared supplemented sawdust block can produce 500 to 800 grams of fresh mushrooms across two to three flushes. With a grow room of even modest size, you can produce enough to supply a weekly farmers market stall or keep your kitchen well-stocked year-round.
Growing Conditions
Understanding the ideal conditions for chestnut mushrooms is essential before you begin. Here's what Pholiota adiposa needs at each stage:
Colonization Phase
- Temperature: 21–24°C (room temperature works well)
- Humidity: Not critical during colonization — bags stay sealed
- Light: None required; darkness is fine
- Duration: 14–21 days for full colonization
- Air exchange: Minimal (filter patch on grow bag provides sufficient gas exchange)
Fruiting Phase
- Temperature: 15–21°C (cooler temperatures produce denser, higher-quality fruits)
- Humidity: 85–95% relative humidity
- Light: Indirect ambient light or 12 hours of low-intensity light per day
- Air exchange: Fresh air 4–6 times per hour (CO2 below 800 ppm ideal)
- Duration: Pins appear 5–10 days after fruiting initiation; harvest 5–7 days after pinning
Chestnut mushrooms are particularly well-suited to Canadian growing because they prefer cooler fruiting temperatures. A basement, garage, or unheated room in spring or autumn often provides near-perfect conditions without any climate control equipment.
Substrate Options
Choosing the right substrate is critical for healthy yields. Chestnuts are primarily wood-decomposing fungi, so wood-based substrates perform best. For a deeper dive into substrate science, see our complete mushroom substrate guide.
Supplemented Hardwood Sawdust (Recommended)
The gold standard for chestnut mushroom cultivation:
- 80% hardwood sawdust (maple, oak, beech, or birch)
- 20% wheat bran or oat bran (nitrogen supplement)
- Moisture content: 60–65% (squeeze test: a few drops of water when firmly squeezed)
This recipe provides an excellent balance of nutrition and colonization speed. The bran supplement boosts yields significantly without creating excessive contamination risk.
Masters Mix
A popular alternative that produces excellent results:
- 50% hardwood sawdust
- 50% soy hull pellets
- Moisture content: 60–65%
Masters mix is nutrient-rich and can produce slightly higher yields than standard supplemented sawdust, though it requires careful sterilization due to the higher nutrient load.
Straw (Budget Option)
Pasteurized wheat or oat straw can work for chestnuts, though yields are typically 30–40% lower than wood-based substrates:
- Chopped straw (5–10 cm lengths)
- Pasteurized at 65–80°C for 60–90 minutes
- Moisture content: 70–75%
Straw is a good option if you're just starting out and want to minimize equipment costs, as it only requires pasteurization rather than full sterilization.
Step-by-Step Growing Guide
Step 1: Prepare Your Substrate
Measure your dry ingredients according to your chosen recipe. For supplemented hardwood sawdust:
- Weigh out 800 grams of hardwood sawdust pellets (they'll expand when hydrated)
- Add 200 grams of wheat bran
- Mix thoroughly while dry
- Add water gradually until you reach 60–65% moisture content (approximately 1.5 to 1.8 litres for this amount of dry material)
- Mix until uniformly hydrated — no dry pockets
Load the hydrated substrate into autoclavable grow bags with filter patches. Aim for 2 to 2.5 kilograms of wet substrate per bag.
Step 2: Sterilize
Sterilize your bags at 15 PSI (121°C) for 2.5 hours in a pressure cooker or autoclave. Allow bags to cool completely to room temperature before inoculating — this typically takes 8 to 12 hours.
Important: Never rush the cooling process. Inoculating warm substrate will kill your spawn and invite thermophilic contaminants.
Step 3: Inoculate
Working in front of a laminar flow hood or in a still-air box:
- Wipe down your chestnut mushroom spawn bag and tools with 70% isopropyl alcohol
- Open your cooled substrate bag at the top
- Add spawn at a rate of 5–10% of substrate weight (100–250 grams per bag)
- Break up the spawn and distribute evenly throughout the substrate
- Seal the bag with an impulse sealer or fold and tape securely
A higher spawn rate (10%) accelerates colonization and reduces contamination risk, though it uses more spawn per bag. For beginners, we recommend erring on the higher side.
If you prefer to start from scratch, you can also work from a chestnut OG agar culture and expand to grain spawn yourself.
Step 4: Colonize
Place your inoculated bags in a clean area at 21–24°C:
- Keep bags out of direct sunlight
- Don't stack bags — allow air circulation around each one
- Check weekly for signs of contamination (green, black, or orange patches)
- Healthy mycelium will appear white and ropey, with a faintly sweet smell
Full colonization typically takes 14 to 21 days. You'll know the block is ready when the entire surface is covered in thick, white mycelium with no visible uncolonized substrate.
Step 5: Initiate Fruiting
Once fully colonized, it's time to trigger fruiting:
- Move blocks to your fruiting chamber or growing area
- Cut an "X" shape (approximately 5 cm across) in the bag, or remove the top third of the bag entirely
- Drop the temperature to 15–18°C if possible (even a few degrees cooler helps)
- Maintain humidity at 85–95% — mist the walls of your fruiting chamber, not the blocks directly
- Provide fresh air exchange and indirect light
Primordia (tiny pin-like formations) should appear within 5 to 10 days. Once pins form, maintain consistent conditions — fluctuations in humidity or temperature can cause pins to abort.
Step 6: Maintain Fruiting Conditions
As your mushrooms develop from pins to mature clusters:
- Continue misting to maintain humidity (2–4 times daily in most setups)
- Ensure adequate fresh air — if stems are elongating excessively, increase air exchange
- Monitor for even development across the cluster
- Avoid misting directly onto developing pins, as standing water can encourage bacterial blotch
Step 7: Harvest
Chestnut mushrooms are ready to harvest when the caps have flattened but the edges are still slightly curled inward. At this stage, the caps will be 3 to 7 centimetres across with firm, meaty flesh.
Signs it's time to harvest:
- Caps have expanded from convex to nearly flat
- Edges retain a slight inward curl
- Colour is rich golden-brown with a slight sheen
- Gills are visible but have not yet released spores (no dark powder on lower caps)
Harvest the entire cluster by twisting and pulling gently at the base, or cut with a clean knife. Leaving stumps invites contamination, so try to remove the entire fruiting body cleanly.
Step 8: Subsequent Flushes
After harvesting your first flush:
- Remove any remaining stubs or debris from the block surface
- Soak the block in cold water for 2 to 4 hours (optional but helps rehydrate)
- Return to fruiting conditions
- A second flush typically appears within 10 to 14 days
- Expect 2 to 3 productive flushes, with each subsequent flush yielding somewhat less
Alternatively, for a hands-off approach, try our ready-to-fruit chestnut mushroom grow kit — just open, mist, and harvest.
Harvesting Tips for Market Growers
If you're growing chestnuts for sale, presentation matters:
- Harvest in clusters rather than individual mushrooms — clusters display beautifully and command higher prices
- Harvest in the morning when humidity is highest and caps are at their most vibrant
- Use shallow containers for packaging — chestnuts bruise less than oysters but still benefit from gentle handling
- Refrigerate immediately after harvest at 2–4°C
- Shelf life is excellent: 7 to 10 days refrigerated, making them ideal for weekly market schedules
Cooking with Chestnut Mushrooms
Chestnut mushrooms shine in the kitchen thanks to their firm texture and distinctive nutty, buttery flavour. Here are some preparation tips:
Best Cooking Methods
- Sautéed in butter: The classic preparation. Cook over medium-high heat for 5 to 7 minutes until golden. The nutty flavour intensifies beautifully with browning. Finish with a pinch of flaky salt and fresh thyme.
- Roasted: Toss whole clusters with olive oil, garlic, and herbs. Roast at 200°C for 15 to 20 minutes until edges are crispy. The roasting process concentrates their flavour remarkably.
- In soups and risottos: Their firm texture holds up through long cooking without becoming slimy. Add to cream-based soups for a naturally nutty richness.
- Grilled or barbecued: Thread onto skewers or place whole clusters directly on the grill. The firm flesh chars beautifully without falling apart.
- Pickled: Quick-pickle in rice vinegar, sugar, and chili flakes for a tangy condiment that pairs beautifully with charcuterie boards.
Flavour Pairings
Chestnut mushrooms pair exceptionally well with:
- Brown butter and sage
- Aged cheddar or gruyère
- Fresh thyme, rosemary, and garlic
- Hazelnuts and walnuts (complementing the nutty notes)
- Cream sauces and risottos
- Red wine reductions
- Root vegetables (parsnips, celeriac, sweet potato)
Common Problems and Solutions
Slow Colonization
Symptoms: Mycelium barely growing after 10+ days, patchy colonization.
Causes and fixes:
- Temperature too low — ensure 21–24°C during colonization
- Substrate too wet — should produce only a few drops when firmly squeezed
- Low spawn rate — use at least 5% spawn by weight (10% is safer)
- Old or weak spawn — use fresh spawn within 2 weeks of receiving it
Contamination (Green or Black Mould)
Symptoms: Green (Trichoderma), black (Aspergillus), or orange patches appearing on substrate.
Causes and fixes:
- Inadequate sterilization — ensure full 2.5 hours at 15 PSI
- Poor aseptic technique during inoculation — work in a flow hood or SAB
- Substrate too nutrient-rich for your sterility level — reduce bran to 15%
- Warm weather increases contamination pressure — avoid inoculating during heat waves
If contamination appears during colonization, remove the affected bag immediately. Do not open contaminated bags indoors, as this spreads spores to your clean workspace.
Leggy, Elongated Stems
Symptoms: Stems growing excessively long with small caps.
Cause: Insufficient fresh air exchange. High CO2 levels signal the fungus to elongate stems in search of open air.
Fix: Increase ventilation in your fruiting chamber. If using a shotgun fruiting chamber, ensure holes aren't blocked. For Martha tents, run your fan on a more frequent cycle.
Pins Forming but Aborting
Symptoms: Tiny pins appear then brown and shrivel without developing.
Causes and fixes:
- Humidity dropping below 80% — increase misting frequency
- Temperature fluctuations — maintain consistent 15–21°C
- Drafts drying out pins directly — redirect airflow away from fruiting surfaces
- Bacterial contamination — ensure misting water is clean (filtered or boiled and cooled)
Low Yields
Symptoms: Small clusters, thin mushrooms, or only one weak flush.
Causes and fixes:
- Insufficient supplementation — ensure 20% bran in your recipe
- Block too dry — soak between flushes for 2 to 4 hours
- Block too small — use at least 2 kilograms of wet substrate per block
- Genetics — try different spawn sources; some strains are significantly more productive
Frequently Asked Questions
How long does it take to grow chestnut mushrooms from start to finish?
From inoculation to first harvest, expect approximately 4 to 6 weeks total. Colonization takes 14 to 21 days, followed by 10 to 17 days of fruiting (5–10 days to pinning, then 5–7 days to harvest). Subsequent flushes appear every 10 to 14 days.
Can I grow chestnut mushrooms on logs outdoors?
Yes, chestnut mushrooms grow well on hardwood logs inoculated with plug spawn. Drill holes every 15 centimetres, insert spawn plugs, and seal with cheese wax. Outdoor logs take 6 to 12 months to colonize but can produce mushrooms for 3 to 5 years. Beech, oak, and maple logs work best in Canadian climates.
What's the difference between Pholiota adiposa and store-bought chestnut mushrooms?
In some markets, "chestnut mushroom" refers to brown-capped strains of Agaricus bisporus (essentially a darker cremini). True chestnut mushrooms (Pholiota adiposa) are an entirely different species with a distinct nutty flavour, cluster growth pattern, and golden-brown colouring. They are a far more flavourful and visually striking mushroom.
Are chestnut mushrooms profitable to sell?
Absolutely. Chestnut mushrooms command premium prices at Canadian farmers markets ($18–$25/lb) because they're rare in retail, visually stunning, and have an unforgettable flavour. Their firm texture gives them a 7 to 10 day shelf life, reducing waste compared to more delicate species. Combined with strong yields per block, they're one of the most profitable species for small-scale growers.
Can I grow chestnut mushrooms without a pressure cooker?
While a pressure cooker is strongly recommended for supplemented sawdust substrates, you can grow chestnuts on pasteurized straw (65–80°C for 90 minutes) without one. Yields will be lower, but it's a viable entry point. Another option is purchasing a ready-made chestnut mushroom grow kit that eliminates the need for any sterilization equipment.
Get Started Growing Chestnuts
Chestnut mushrooms offer a perfect balance of ease, profitability, and culinary excellence. Whether you're a home grower looking to diversify your harvest or a market farmer seeking a premium product that stands out from the crowd, Pholiota adiposa delivers on all fronts.
Ready to start? Grab a bag of chestnut mushroom spawn and follow the steps above. With consistent conditions and good technique, you'll be harvesting beautiful golden clusters within a month.
Need help with your grow? Dr. MycoThumb is our free AI growing assistant — ask about substrates, contamination, fruiting conditions, or any cultivation question. Available 24/7 in the chat bubble at the bottom-right of every page.