If you're moving beyond grow kits into DIY mushroom cultivation, you'll encounter two primary inoculation methods: grain spawn and liquid culture. Both contain living mycelium, but they serve different purposes and suit different workflows. Understanding the differences between these two forms of mushroom culture will save you time, money, and frustration — whether you're growing your first bag of oyster mushrooms or scaling up to hundreds of blocks per week.
This guide breaks down everything you need to know: what each one is, how they differ, when to use which, and how to get started with both.
What Is Grain Spawn?
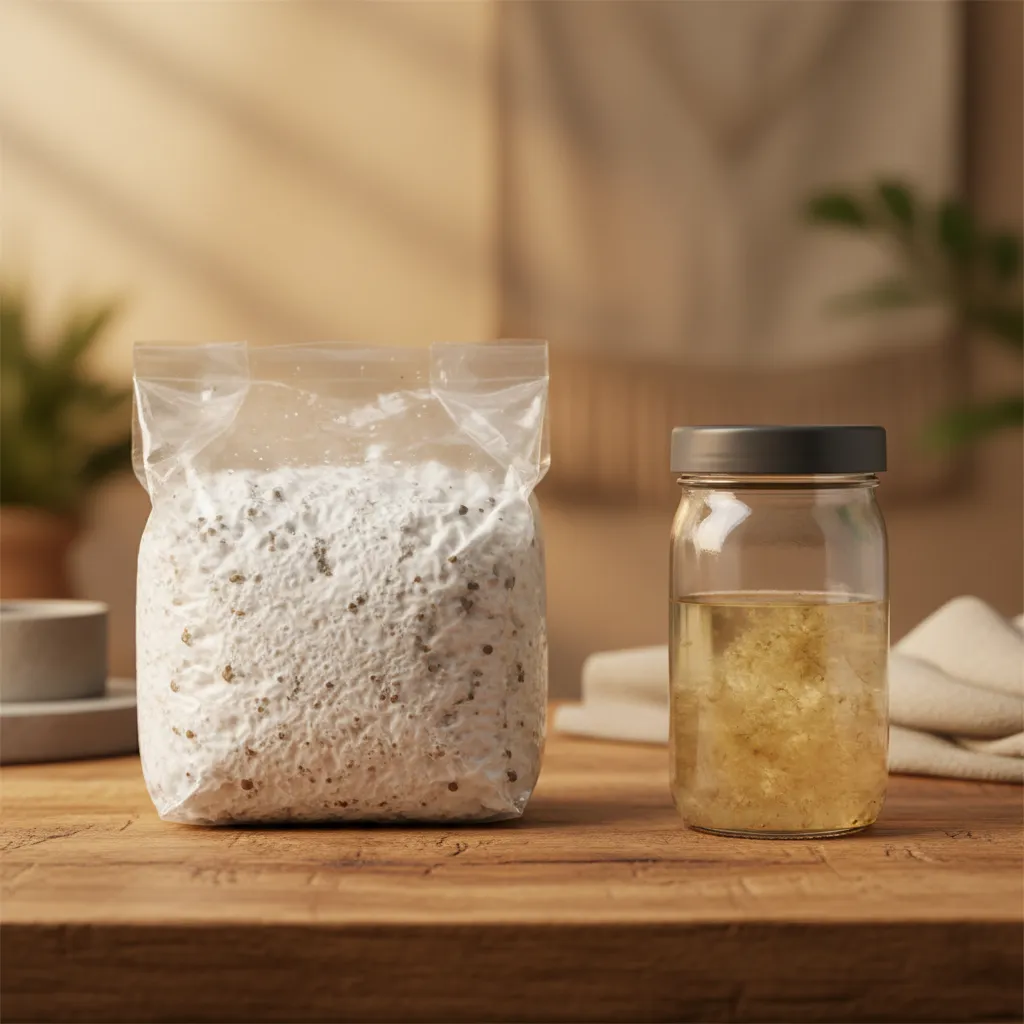
Grain spawn is sterilized grain — in our case, organic millet — that has been fully colonized by mushroom mycelium. It looks like a bag of white, fluffy grain. You use it by mixing it into a substrate (like hardwood sawdust or straw) to create fruiting blocks.
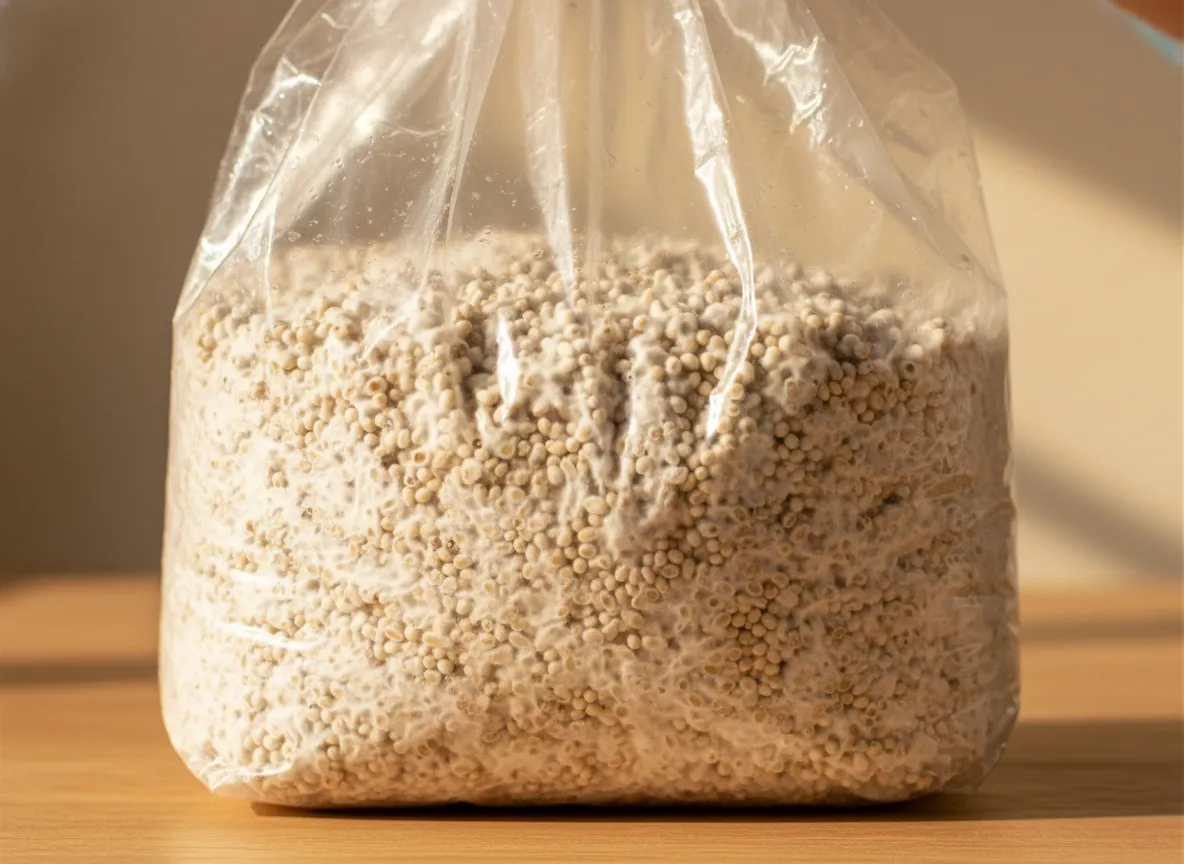
Think of grain spawn as the "ready to use" option. The mycelium has already established itself on the grain, so when you introduce it to substrate, colonization is fast and vigorous. Each individual grain kernel acts as its own inoculation point — when you mix a bag of spawn into substrate, you're distributing thousands of colonization points throughout the material. This is why grain spawn colonizes substrate so much faster than other methods.
Common grains used for spawn production include rye berries, millet, wheat, oats, and sorghum. Each has its own advantages. Millet, which we use at Nature Lion, offers the smallest kernel size, meaning more inoculation points per gram. Rye berries are popular among home growers because they're forgiving during preparation. Our guide on how to make mushroom spawn covers grain selection in detail.
Grain spawn is produced in sterile laboratory conditions. The grain is hydrated, sterilized in a pressure cooker or autoclave, cooled, and then inoculated with a live culture — either from liquid culture, agar, or another batch of grain spawn (grain-to-grain transfer). Colonization typically takes 10-14 days at room temperature before the spawn is ready to use.
How Grain Spawn Is Used
Using grain spawn is straightforward. Here's the basic process:
- Prepare your substrate — pasteurize or sterilize your bulk substrate (hardwood sawdust, straw, supplemented sawdust, etc.)
- Break up the spawn — shake or break apart the colonized grain so the kernels separate
- Mix spawn into substrate — combine at the correct spawn-to-substrate ratio (typically 10-20% by weight)
- Pack into bags or containers — load the mixture into grow bags, buckets, or monotubs
- Incubate — allow the mycelium to colonize the substrate (usually 10-21 days depending on species)
- Initiate fruiting — expose to fresh air, light, and humidity to trigger mushroom formation
A single 5 lb bag of lion's mane grain spawn can inoculate 25-50 lbs of substrate, producing multiple flushes of mushrooms over several weeks.
What Is Liquid Culture?
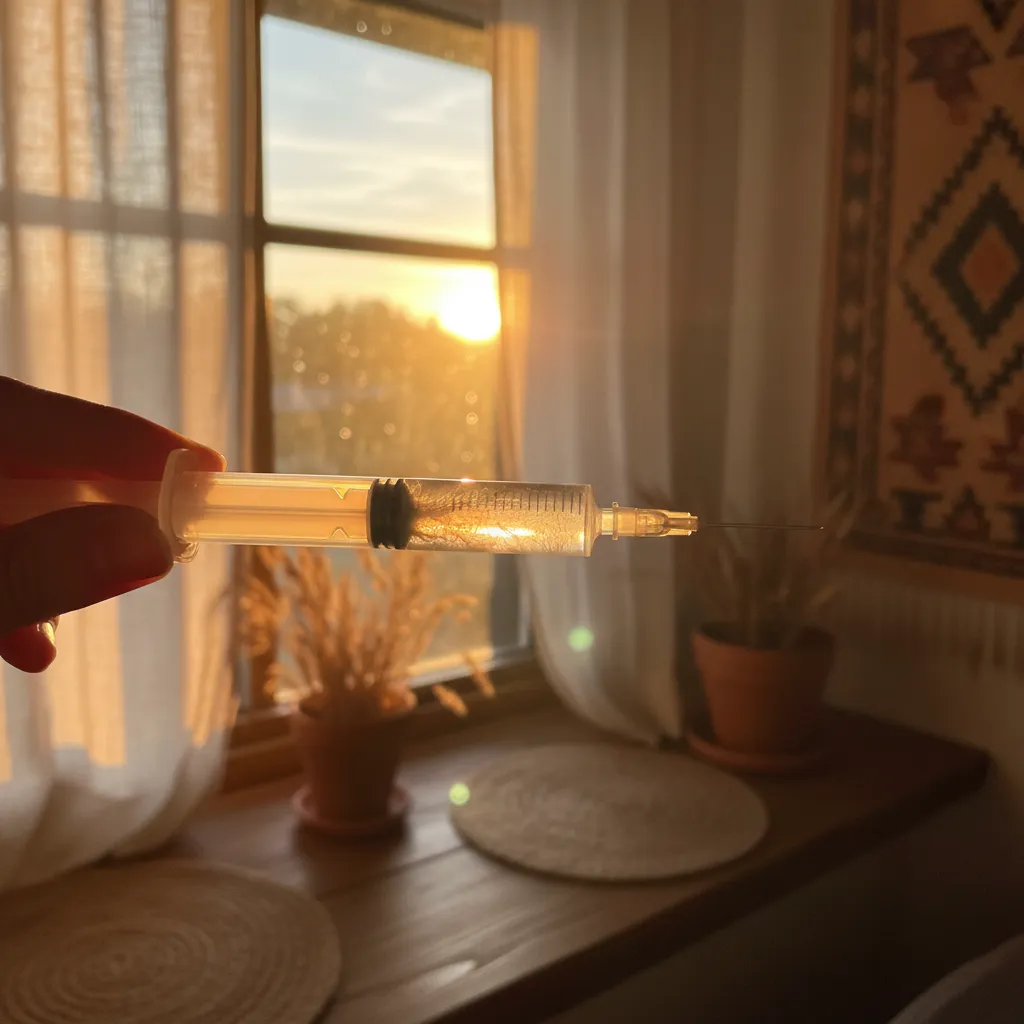
Liquid culture (LC) is living mycelium suspended in a sterile nutrient broth — typically water with a small percentage of sugar (honey, light malt extract, or dextrose). It comes in a syringe — our hobby syringes are 3cc, and our commercial jars are 200ml. You use it to inoculate grain, agar, or sometimes substrate directly.
Liquid culture is one step earlier in the cultivation process. You use LC to make grain spawn, or to start agar plates for genetic isolation. When you inject liquid culture into a jar of sterilized grain, the mycelium in the solution begins colonizing the grain — and within a couple of weeks, you have grain spawn ready to use. If you want to make your own LC from scratch, our honey liquid culture recipe walks through the entire process.
The key advantage of liquid culture is expansion potential. A single 3cc syringe contains enough mycelium to inoculate several jars of grain. Each of those jars, once colonized, can be used to inoculate even more grain through grain-to-grain transfers. From one syringe, a skilled grower can produce dozens of kilograms of grain spawn.
Liquid culture also allows you to maintain a culture library. You can store syringes of different species in the fridge for months, pulling them out whenever you need to start a new batch. This is far more convenient than maintaining agar plates or keeping grain spawn alive (which has a much shorter shelf life).
How Liquid Culture Is Used
Using liquid culture requires more care and sterile technique than grain spawn. Here's the process:
- Prepare grain jars — hydrate and sterilize grain in mason jars or spawn bags with self-healing injection ports
- Sterilize your workspace — work in front of a flow hood or inside a still air box
- Flame-sterilize the needle — heat the syringe needle until it glows red, then let it cool briefly
- Inject through the port — push 0.5-1cc of liquid culture into each jar through the injection port or through micropore tape
- Incubate the grain — store jars at 21-24 degrees Celsius and wait for full colonization (14-21 days)
- Use colonized grain as spawn — once fully colonized, the grain is ready to mix into substrate
From there, you follow the same process as using grain spawn — mix into substrate, incubate, and fruit. The difference is that liquid culture adds an extra colonization step before you reach the substrate stage.
A single lion's mane liquid culture syringe can produce enough grain spawn to inoculate well over 100 lbs of substrate when you factor in grain-to-grain expansion.
Key Differences: Grain Spawn vs Liquid Culture
Understanding the core differences helps you choose the right option for your setup, budget, and experience level.
Format and Appearance
Grain spawn is a solid material — colonized grain kernels bound together by white mycelium. It's bulky and has significant weight. Liquid culture is a clear or slightly cloudy liquid with visible mycelium strands floating in it. It's lightweight and compact, making it easy to ship and store.
Shelf Life
Grain spawn has a relatively short shelf life. At room temperature, it remains viable for 2-3 weeks before the mycelium begins to exhaust the grain's nutrients and the spawn loses vigour. Refrigerated, you can extend this to about 4-6 weeks, though viability decreases over time. Liquid culture, by contrast, can last 3-6 months or longer when stored in the fridge at 2-4 degrees Celsius. The mycelium enters a dormant state in the cold nutrient solution and revives when warmed up.
Colonization Speed
Because grain spawn introduces thousands of established colonization points into your substrate, it colonizes significantly faster than liquid culture. A fruiting block inoculated with grain spawn at a 10% rate can be fully colonized in 10-14 days. Liquid culture needs to colonize grain first (14-21 days), and then that grain needs to colonize substrate (another 10-14 days) — roughly double the total time to fruiting.
Contamination Risk
Grain spawn carries lower contamination risk for the end user because it's ready to use. You don't need sterile technique to mix spawn into pasteurized substrate — just clean hands and a clean workspace. Liquid culture requires sterile inoculation technique. Every time you push a needle through an injection port, there's a chance of introducing a contaminant. Without a flow hood or well-made still air box, contamination rates can be significant for beginners.
Expansion Potential
This is where liquid culture wins decisively. A 3cc syringe of LC costs a fraction of a 5 lb bag of grain spawn, yet it can produce far more total spawn through successive grain-to-grain transfers. For growers who want to maximize production from a small investment, liquid culture is the more economical long-term choice.
Comparison Table
| Factor | Grain Spawn | Liquid Culture |
|---|---|---|
| Format | Colonized grain kernels (solid) | Mycelium in nutrient broth (liquid) |
| Best for | Making fruiting blocks directly | Inoculating grain or agar |
| Skill level | Beginner-friendly | Intermediate (requires sterile technique) |
| Speed to fruit | Faster (skip grain colonization step) | Slower (need to colonize grain first) |
| Yield per unit | 1 bag (5 lb) = 25-50 lbs substrate | 1 syringe (3cc) = 2-5 quarts of grain |
| Expansion potential | Limited (use as-is or grain-to-grain) | High (one syringe can produce dozens of jars) |
| Cost per unit | Higher upfront | Lower cost per syringe |
| Cost at scale | Higher (need more bags) | Much lower (massive expansion) |
| Shelf life | 2-3 weeks room temp, 4-6 weeks fridge | 3-6 months refrigerated |
| Contamination risk | Lower (ready to use) | Higher (requires sterile inoculation) |
| Equipment needed | Minimal (clean workspace) | Flow hood or still air box, syringes, grain jars |
| Shipping | Heavier, seasonal concerns | Lightweight, ships year-round |
When to Use Grain Spawn
Choose grain spawn if you want to go from bag to mushrooms with minimal steps. It's ideal for:
- Beginners making their first fruiting blocks who don't have sterile technique down yet
- Commercial growers who need consistent, fast turnaround and can't afford failed batches
- Growers without sterile equipment — no flow hood or still air box required
- Seasonal or occasional growers who want to do a few batches without building a full lab setup
- Anyone who values simplicity — open the bag, mix into substrate, and wait for mushrooms
Our grain spawn is produced on organic millet in our CFIA-licensed lab. Each 5 lb bag is enough to inoculate 25-50 lbs of substrate at a 10-20% spawn rate. If you're preparing your own grain, our Grain Preparation Calculator gives you exact water, soak, and cook times for rye, millet, wheat, and oats. For help dialling in your ratios, see our mushroom spawn ratio guide.
When to Use Liquid Culture
Choose liquid culture if you want to expand your own grain spawn, work with agar, or maintain a culture library. It's ideal for:
- Intermediate growers who want to make their own spawn and reduce ongoing costs
- Hobbyists who enjoy agar work, genetic isolation, and experimenting with different strains
- Anyone who wants maximum expansion from a small investment
- Growers maintaining multiple species — store a library of cultures in the fridge and use as needed
- Commercial operations that produce spawn in-house to reduce per-bag costs
A single 3cc syringe of LC can inoculate 2-5 quart jars of grain. You'll need wide-mouth mason jars, syringes and needles, and a still air box. Once those jars are colonized, each one can be used as grain-to-grain transfer to make even more spawn.
Bernardin Wide-Mouth Mason Jars — 12 Pack
Whether you're making grain spawn or liquid culture, wide-mouth mason jars are the foundation. Bernardin is the Canadian standard for quality and availability.
View on Amazon.ca →When you buy through our links, it supports our mycology research at no extra cost to you.
How to Use a Liquid Culture Syringe
If you've purchased a liquid culture syringe, here's exactly how to use it to inoculate grain bags or jars. This process requires basic sterile technique, but it's well within reach of any intermediate grower with a still air box or flow hood.
What You'll Need
- Liquid culture syringe (3cc or larger)
- Sterilized grain in jars with self-healing injection ports, or filter-patch spawn bags
- A still air box or laminar flow hood
- Isopropyl alcohol (70%) and a clean cloth or spray bottle
- A lighter or alcohol lamp for flame-sterilizing the needle
- Clean gloves (nitrile or latex)
Step 1: Prepare Your Workspace
Set up your still air box on a clean, draft-free surface. Wipe down the inside with 70% isopropyl alcohol. Let it settle for 5-10 minutes — you want the air inside completely still before opening anything. If you're using a flow hood, simply turn it on 10 minutes before you begin and work downstream of the filter.
Step 2: Warm and Shake the Syringe
Liquid culture syringes stored in the fridge will have dormant mycelium that may have settled to the bottom. Remove the syringe from the fridge 30-60 minutes before use and let it reach room temperature. Before inoculating, shake the syringe vigorously for 10-15 seconds to break up mycelium clumps and distribute them evenly through the solution. You should see small white fragments suspended throughout the liquid.
Step 3: Sterilize the Needle
Remove the needle cap and flame-sterilize the entire needle until it glows orange. Let it cool for 10-15 seconds — don't blow on it or touch it to anything. The residual heat will cool quickly. If you're inoculating multiple jars, re-sterilize between each one. This single step prevents cross-contamination and is the most important part of the process.
Step 4: Inject Into Grain
For jars with injection ports, push the needle through the self-healing port at a slight angle. For spawn bags with injection ports, the process is identical. Depress the plunger slowly and inject 0.5-1cc of liquid culture per quart jar or 1-2cc per 3-5 lb spawn bag. You don't need much — a little goes a long way. A single 3cc syringe can inoculate 3-6 quart jars or 2-3 spawn bags.
If your jars don't have injection ports, you can inject through micropore tape covering a hole in the lid. Push the needle through, inject, and immediately cover with a fresh piece of tape if the original doesn't self-seal.
Step 5: Distribute and Incubate
After injection, tilt the jar gently to spread the liquid culture across multiple grain surfaces. This creates more inoculation points and speeds colonization. Place inoculated jars in a clean area at 21-24°C (70-75°F). Don't stack them — air circulation helps maintain even temperature.
What to Expect After Inoculation
- Days 1-5: No visible growth. The mycelium is germinating and establishing at the injection site.
- Days 5-10: Small white patches appear near where the liquid pooled. This is healthy mycelial growth.
- Days 10-21: White mycelium spreads outward, colonizing grain kernel by kernel. Growth should be white and ropey.
- Day 21-28: Full colonization. The entire jar or bag should be uniformly white with no uncolonized grain visible.
If you see any green, black, orange, or pink growth, or smell anything sour or foul, the jar is contaminated — discard it immediately and don't open it indoors. Contamination during LC inoculation usually means the needle wasn't properly sterilized or the workspace wasn't clean enough.
Once your grain is fully colonized, you have fresh grain spawn ready to mix into bulk substrate for fruiting blocks. Browse our full selection of liquid culture syringes to find your species.
Cost Comparison: Hobbyist vs Commercial
One of the biggest factors in choosing between grain spawn and liquid culture is cost — and the answer changes depending on your scale.
Hobbyist Growers (1-10 Blocks per Month)
For hobbyists growing a few blocks at a time, grain spawn is often the better value. Here's why: a 5 lb bag of grain spawn costs around $25-35 CAD and produces 5-10 fruiting blocks. That's roughly $3-7 per block for the spawn component. The simplicity also saves money — you don't need a still air box, pressure cooker, or extra supplies.
Liquid culture syringes are cheaper per unit (around $15-20 CAD), but you need additional equipment: a pressure cooker ($100-200), mason jars ($15-20 per case), a still air box ($20-40 to build), and injection port lids ($15-30). Those startup costs only make sense if you plan to grow consistently over many months.
Commercial Growers (50+ Blocks per Week)
At commercial scale, liquid culture wins on economics. The math changes dramatically when you're producing hundreds of blocks per week. A commercial grower buying grain spawn at $25-35 per 5 lb bag spends thousands per month on spawn alone. By producing spawn in-house from liquid culture, the cost per block drops to pennies — mostly the cost of grain and energy for sterilization.
Most commercial mushroom farms in Canada produce their own grain spawn from liquid culture or agar masters. The initial investment in a flow hood ($500-2000), autoclave or large pressure cooker ($300-800), and supplies pays for itself within the first few months of operation.
The Middle Ground
Many growers start with grain spawn and transition to liquid culture as they gain confidence. There's no rule that says you have to choose one forever. Start simple, build skills, and scale your process as it makes sense.
Can You Make Your Own?
Yes — both grain spawn and liquid culture can be made at home with the right equipment and technique.
Making Your Own Grain Spawn
Our complete guide on how to make mushroom spawn walks through the entire process, including grain selection, hydration, sterilization, inoculation, and the budget-friendly Broke Boi method that doesn't require a pressure cooker. The key requirements are:
- A pressure cooker or autoclave (or Broke Boi steam sterilization)
- Mason jars or spawn bags
- A still air box or flow hood
- A live culture (liquid culture syringe, agar wedge, or existing grain spawn for transfer)
Making Your Own Liquid Culture
Our honey liquid culture recipe covers the full process. It's simpler than making grain spawn — the base is just water and honey (4% by weight), sterilized in a pressure cooker. You inoculate the cooled broth with a small piece of agar culture or a few drops of existing liquid culture, then wait 7-14 days for the mycelium to multiply.
The challenge with DIY liquid culture is quality control. Without testing, you can't be certain your culture is clean until you use it — contaminated LC will ruin every jar it touches. This is one reason many growers prefer to buy verified liquid cultures from a trusted supplier and use them to produce grain spawn, rather than trying to maintain their own culture library from scratch.
Which Is Better for Beginners?
Grain spawn is the clear winner for beginners. Here's why:
- No sterile technique required — you mix grain spawn into pasteurized substrate in open air. As long as your workspace is reasonably clean, contamination rates are low.
- Fewer steps — grain spawn goes directly into substrate. Liquid culture requires you to first colonize grain, then use that grain as spawn. That's an extra 2-3 weeks and an extra opportunity for contamination.
- No special equipment — you don't need a flow hood, still air box, pressure cooker, or injection syringes. Just the spawn, substrate, and a grow bag or container.
- Faster results — from grain spawn to first harvest can be as quick as 3-4 weeks. From liquid culture, add another 2-3 weeks for the grain colonization step.
- Higher success rate — because there are fewer steps and less sterile work involved, beginners using grain spawn have significantly higher success rates than those starting with liquid culture.
If you're brand new to mushroom growing, we recommend starting with a bag of lion's mane grain spawn or another species from our spawn collection. Mix it into substrate, follow the basic fruiting conditions, and enjoy your first harvest. Once you've done a few successful grows and want to reduce costs, that's the time to explore liquid culture and making your own spawn.
Can You Use Both Together?
Absolutely. Many growers use liquid culture to produce their own grain spawn, then use that spawn to make fruiting blocks. This is the most cost-effective approach at scale, but it requires sterile technique and more equipment.
A common workflow looks like this:
- Purchase a verified liquid culture syringe — start with a clean, tested culture from a trusted supplier
- Inoculate grain jars — inject LC into sterilized grain using sterile technique
- Expand via grain-to-grain transfer — use colonized jars to inoculate more grain (each jar can produce 4-10 more)
- Mix expanded spawn into substrate — use the final generation of grain spawn to create fruiting blocks
- Fruit and harvest — standard fruiting conditions for your species
This hybrid approach gives you the expansion benefits of liquid culture with the reliability of grain spawn for the final inoculation step.
If you're just getting started, grab a bag of grain spawn and a bag of substrate — you'll be harvesting mushrooms in 3-4 weeks. Once you're comfortable with the process, try liquid culture to start making your own spawn.
FAQ
Can I use liquid culture directly on substrate without making grain spawn first?
Technically yes, but it's not recommended for most species. Liquid culture applied directly to substrate colonizes very slowly because there are far fewer inoculation points compared to grain spawn. The extended colonization time increases contamination risk significantly. The exception is some fast-colonizing oyster mushroom strains on straw, where direct LC inoculation can work — but even then, grain spawn gives better results.
How do I know if my liquid culture is contaminated?
Healthy liquid culture should be clear or slightly cloudy with visible white mycelium strands. Warning signs include unusual colours (green, black, orange, or pink), a foul or sour smell when you open the jar, excessive cloudiness with no visible mycelium structure, or a slimy biofilm on the surface. When in doubt, inoculate a single test jar of grain and wait — contamination will usually reveal itself within a week as off-colour growth or foul odours.
How long does grain spawn last before it goes bad?
At room temperature (20-24 degrees Celsius), grain spawn remains viable for about 2-3 weeks. After that, the mycelium begins to exhaust the grain's nutrients, the spawn loses vigour, and metabolic waste products build up. Refrigeration at 2-4 degrees Celsius slows metabolism and extends shelf life to 4-6 weeks. Always use the freshest spawn available for best results — colonization speed and contamination resistance both decrease as spawn ages.
Is liquid culture or grain spawn better for lion's mane?
Both work well for lion's mane. If you're a beginner, lion's mane grain spawn is the easiest path — mix it into supplemented hardwood sawdust at a 10-15% rate and you'll see pins in 2-3 weeks. If you're producing multiple blocks, a lion's mane liquid culture syringe lets you make your own grain spawn and scale up economically. Lion's mane mycelium is moderately fast-growing and does well in both formats.
Can I store grain spawn in the freezer for longer shelf life?
No — freezing kills mushroom mycelium. The ice crystals that form during freezing puncture cell walls and destroy the living tissue. Always store grain spawn in the fridge (2-4 degrees Celsius), never the freezer. Liquid culture is similarly sensitive to freezing, though some advanced cultivators use glycerol-based cryopreservation methods to store cultures long-term in laboratory freezers. For home growers, refrigeration is the safest storage method for both formats.
Need help with your grow? Dr. MycoThumb is our free AI growing assistant — ask about substrates, contamination, fruiting conditions, or any cultivation question. Available 24/7 in the chat bubble at the bottom-right of every page.