If you're growing mushroom species that naturally fruit on enriched soil and animal dung, hardwood sawdust won't cut it. These coprophilous (dung-loving) species need a substrate that mimics the nutrient-rich, moisture-retentive environment of a pasture floor. That's where manure-based substrate comes in.
This guide covers everything about manure-based mushroom substrate: what it is, why it works, how the components function together, and how to prepare or source it. Whether you're building your own blend or looking for a ready-to-use sterilized option, understanding the science behind the substrate will make you a better grower.
What Is Manure-Based Mushroom Substrate?
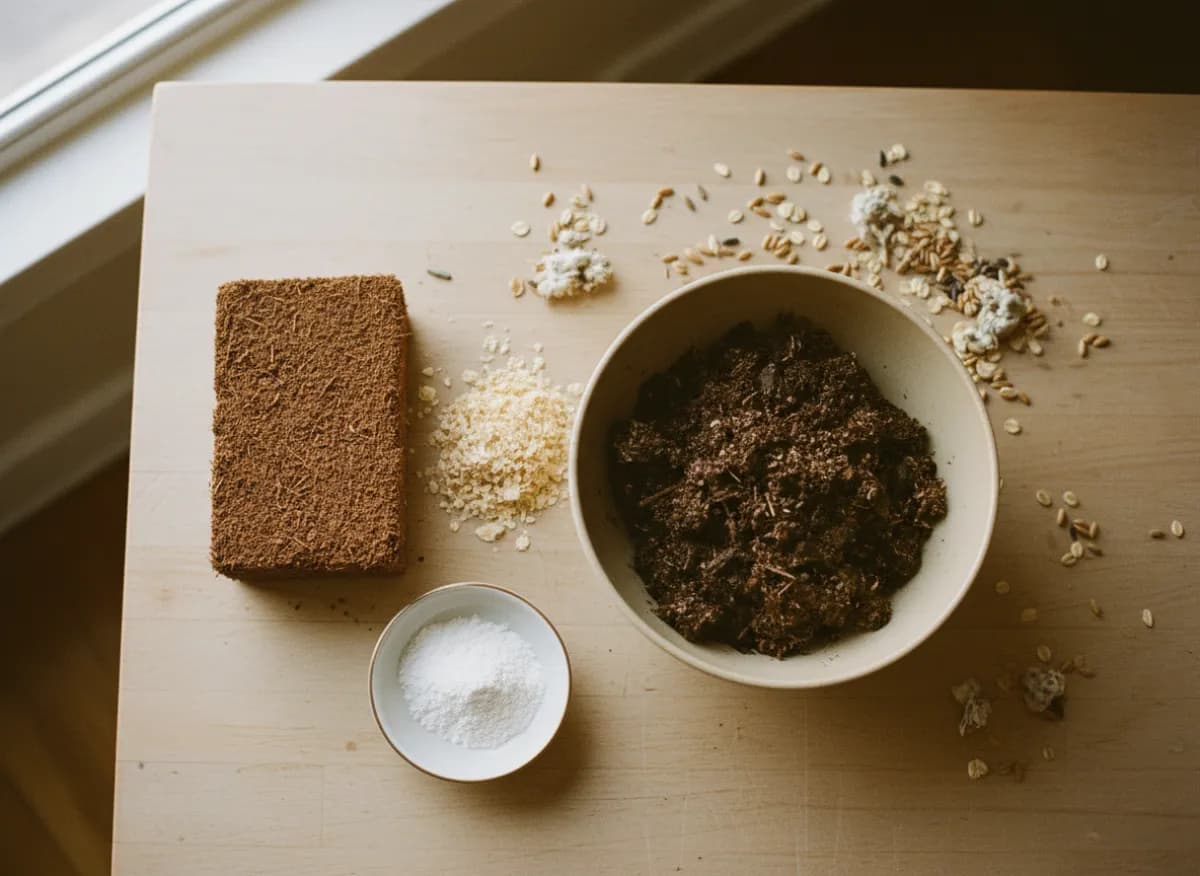
Manure-based substrate is a growing medium composed primarily of composted animal manure (typically cow or horse), combined with coconut coir, vermiculite, and gypsum. It provides the nutrient density, moisture retention, and microbial environment that dung-loving mushroom species require for aggressive colonization and generous fruiting.
Unlike hardwood-based substrates used for species like lion's mane, oyster, and shiitake, manure-based blends are specifically formulated for coprophilous fungi — species that have evolved to decompose and fruit on animal dung and enriched soils in nature.
The standard blend follows a ratio of roughly 2:1:1 — two parts composted manure to one part coconut coir to one part vermiculite, with 5-10% gypsum by dry weight.
The Four Components (And What Each Does)
Coconut Coir — Moisture Retention & Structure
Coconut coir is the fibrous material extracted from coconut husks. In substrate formulation, it serves as the structural backbone.
Why it works:
- Holds 8-9 times its weight in water while maintaining air pockets
- Naturally resistant to bacterial and mold contamination due to high lignin content
- Near-neutral pH (5.5-6.8), which most mushroom species prefer
- Sustainable and consistent — unlike peat moss, coir production doesn't deplete ecosystems
- Slow to decompose, maintaining structure throughout multiple flushes
Coconut coir alone is too nutrient-poor for most species. It needs to be combined with a nitrogen source (manure) and a moisture buffer (vermiculite) to become a complete substrate.
Vermiculite — Aeration & Water Buffering
Vermiculite is a naturally occurring mineral (hydrated magnesium-aluminum-iron silicate) that expands dramatically when heated. The expanded form creates a sponge-like structure with thousands of tiny air pockets.
Why it works:
- Absorbs water and releases it slowly, preventing both waterlogging and drought
- Creates air channels throughout the substrate, essential for healthy mycelial growth
- Lightweight and sterile — adds volume without adding contaminants
- Buffers moisture fluctuations, keeping the substrate at field capacity longer
- Inert — doesn't decompose or change pH over time
The recommended grade for mushroom substrate is coarse or medium vermiculite. Fine-grade packs too tightly and restricts airflow.
Composted Cow Manure — Nutrition
Aged, composted cow manure provides the nitrogen, phosphorus, potassium, and trace minerals that drive vigorous mycelial growth and dense fruiting. Fresh manure is too hot (high ammonia) and carries too many competing organisms. Proper composting breaks down the raw material into a stable, uniform, nutrient-rich medium.
Why it works:
- Rich in nitrogen — the primary nutrient mushroom mycelium needs
- Contains beneficial thermophilic bacteria that create a protective microbial buffer
- Provides slow-release nutrition over multiple flushes
- Well-composted manure has a crumbly, soil-like texture that mixes evenly with coir
Important: The manure must be fully composted. Raw or partially composted manure will generate ammonia, harbor aggressive contaminants, and create anaerobic pockets that kill mycelium. If you can still smell ammonia, it's not ready.
Gypsum — The Secret Ingredient
Gypsum (calcium sulfate) is added at 5-10% by dry weight. It's a seemingly minor addition with outsized effects.
Why it works:
- Provides calcium and sulfur, both essential for mushroom cell wall development
- Prevents substrate clumping by acting as a dispersing agent between coir fibers
- Lowers the tendency of the substrate to become gelatinous when wet
- Creates a slightly more favorable pH environment for mycelial colonization
Without gypsum, manure-based substrates tend to compact over time, reducing the air exchange that mycelium needs. A small amount makes a measurable difference.
Manure vs. Hardwood: Which Substrate for Which Species?
This is the most important decision in substrate preparation. Using the wrong substrate type for your species is the single most common reason for disappointing harvests.
Hardwood-Based Substrates Are Best For:
Species that naturally grow on dead or dying trees:
- Lion's Mane (Hericium erinaceus)
- Oyster mushrooms (Pleurotus spp.)
- Shiitake (Lentinula edodes)
- King Trumpet (Pleurotus eryngii)
- Reishi (Ganoderma lucidum)
- Maitake (Grifola frondosa)
- Chestnut (Pholiota adiposa)
For these species, use our pre-sterilized hardwood blocks or all-in-one mushroom pellets.
Manure-Based Substrates Are Best For:
Coprophilous (dung-loving) species that naturally fruit on enriched soil and animal dung:
- Psilocybe and Panaeolus species
- Agaricus (button/portobello mushrooms)
- Coprinus species (inky caps)
- Stropharia (wine caps, when grown in enriched beds)
- Any species described as "coprophilous" in mycological literature
For these species, our Sterilized Magic Soil provides a ready-to-inoculate manure-based blend.
The Standard Recipe: Ratios by Weight
If you're mixing your own, here's the proven formula:
Basic CVG (No Manure)
| Component | Weight | Volume Ratio |
|---|---|---|
| Coconut coir | 650g | ~5 parts |
| Vermiculite (coarse) | 350g | ~4 parts |
| Gypsum | 50g | ~0.5 parts |
| Water | ~2.5L | Until field capacity |
This produces a clean, contamination-resistant substrate suitable for beginners. It's nutritionally lean, so expect lower yields than a manure-based mix.
Enriched Manure Blend (Magic Soil Formula)
| Component | Weight | Volume Ratio |
|---|---|---|
| Composted cow manure | 500g | ~2 parts |
| Coconut coir | 300g | ~1 part |
| Vermiculite (coarse) | 200g | ~1 part |
| Gypsum | 50g | 5-10% |
| Water | ~2L | Until field capacity |
This produces a nutrient-dense substrate that supports larger, more prolific flushes. The tradeoff: higher nutrition means higher contamination risk if sterilization isn't perfect.
Sterilization vs. Pasteurization: What's the Difference?
This is one of the most debated topics in mushroom cultivation, and getting it wrong can ruin an entire batch.
Pasteurization (60-82°C / 140-180°F for 1-2 hours)
Pasteurization kills most harmful organisms while preserving beneficial thermophilic bacteria. These surviving microbes create a "biological buffer" that actively fights contaminants — essentially your substrate has its own immune system.
Best for: Plain CVG (no manure), straw, and low-nutrient substrates where the biological buffer provides protection without much contamination pressure.
Sterilization (121°C / 250°F at 15 PSI for 2-2.5 hours)
Sterilization kills everything — beneficial and harmful organisms alike. The substrate is a blank slate. This means there's no biological buffer, but there's also zero competition for your mycelium.
Best for: Nutrient-rich substrates (manure blends, supplemented hardwood) where the high nutrient content would feed contaminants faster than beneficial bacteria could control them. Sterilization gives your mycelium a clean field to colonize without competition.
Our approach: Nature Lion's Sterilized Magic Soil is pressure-sterilized at 15 PSI for 2.5 hours in our CFIA-licensed facility. We chose sterilization over pasteurization because the manure component makes the substrate nutrient-rich enough that even small surviving contaminants could outcompete mycelium. Full sterilization eliminates that risk.
Step-by-Step: How to Use Pre-Sterilized Substrate
If you're working with a ready-made sterilized substrate like Magic Soil, the process is straightforward.
Step 1: Prepare Your Workspace
Work in a still air box or in front of a laminar flow hood. Spray everything — your hands, the outside of the substrate bag, the outside of your spawn bag — with 70% isopropyl alcohol.
Step 2: Break Up Your Grain Spawn
Before opening anything, break up your grain spawn inside its sealed bag. Shake and knead until the individual kernels are separated. This ensures even distribution when you mix it into the substrate.
Step 3: Open and Inoculate
Open the substrate bag in your clean workspace. Add grain spawn at a rate of 10-20% by weight (for a 5 lb substrate bag, add 0.5-1 lb of spawn). Use our spawn ratio guide to calculate the exact amount.
Mix the spawn thoroughly throughout the substrate. Don't just dump it on top — even distribution means faster, more uniform colonization.
Step 4: Seal and Incubate
Fold the bag top over and secure with tape or a clip. Store at 24-27°C (75-80°F) in a dark location. Avoid direct sunlight.
Check colonization progress every few days. You should see white mycelial growth spreading from the grain kernels within 3-5 days. Full colonization typically takes 7-14 days depending on spawn rate and temperature.
Step 5: Introduce Fruiting Conditions
Once the substrate is 100% colonized (completely white with no uncolonized patches), it's time to fruit.
For monotub grows:
- Remove the lid or open air holes
- Maintain 90-95% humidity by misting walls and lid
- Provide fresh air exchange (FAE) — fan briefly 2-3 times daily
- Drop temperature slightly to 22-24°C (72-75°F)
- Provide indirect ambient light (12 hours on, 12 off)
Pins should appear within 5-10 days of introducing fruiting conditions.
Common Problems and Solutions
Contamination (Green Mold)
Cause: Trichoderma is the most common contaminant. It's a bright green mold that spreads aggressively.
Prevention: Use fully sterilized substrate, work in a clean environment, and use a generous spawn rate (15-20%). Higher spawn rates mean your mycelium colonizes faster, giving contaminants less time to establish.
Fix: If contamination appears during colonization, the batch is lost. Discard it and review your sterile technique. Read our contamination field guide for identification and prevention.
Slow or Stalled Colonization
Cause: Usually temperature is too low, spawn rate is too low, or the substrate is too wet.
Fix: Verify your incubation temperature is 24-27°C. Ensure substrate is at field capacity, not waterlogged. If spawn rate was below 10%, future batches should use 15-20%.
Substrate Too Wet
Cause: Over-hydration. When you squeeze a handful, water streams out rather than producing just a few drops.
Fix: For DIY substrate, spread it out on a clean surface and let excess moisture evaporate. For pre-sterilized bags, they're formulated at the correct moisture level — if a bag arrives with standing water at the bottom, contact the supplier.
No Pins After Full Colonization
Cause: The substrate needs a change in conditions to trigger fruiting. If you leave it sealed in the dark at incubation temperature, mycelium will just keep growing vegetatively.
Fix: Introduce all four fruiting triggers simultaneously: fresh air, lower temperature, higher humidity, and light. Half-measures don't work — the organism needs a clear environmental signal that conditions have changed.
Why Buy Pre-Sterilized vs. Making Your Own?
Making your own is cheaper per bag — but you need a pressure cooker or autoclave, raw materials, time, and space. Each batch ties up your pressure cooker for 2.5+ hours, and any mistake in sterile technique means a wasted batch.
Pre-sterilized substrate saves time and eliminates risk. Every bag is processed in a controlled environment with verified sterilization parameters. For growers running 6+ tubs, the time savings alone justify the cost — that's 15+ hours of pressure cooker time you get back.
Sterilized Magic Soil — Case of 6
Six 5 lb bags of premium manure-based substrate — composted cow manure, coconut coir, vermiculite, and gypsum. Pressure-sterilized at 15 PSI for 2.5 hours in our CFIA-licensed facility. Ready to inoculate. Just add spawn.
Produced in our CFIA-licensed facility in Brantford, Ontario. Free shipping across Canada.
Related Guides
- How to Prepare Bulk Substrate — the complete walkthrough for DIY substrate prep
- Mushroom Substrate Guide — comparing all substrate types
- Mushroom Spawn Ratio Guide — how much spawn to use per bag
- Mushroom Contamination Field Guide — identifying and preventing contamination
- Best Pressure Cookers for Mushroom Cultivation — if you're making your own substrate
- Bulk Substrate Calculator — calculate exact ratios for any batch size
Need help with your grow? Dr. MycoThumb is our free AI growing assistant — ask about substrates, contamination, fruiting conditions, or any cultivation question. Available 24/7 in the chat bubble at the bottom-right of every page.