
One of the most common questions we get from new growers is "how long does this take?" The honest answer is: it depends on the species, your method, and your conditions. But we can give you a detailed week-by-week breakdown that covers the three most popular gourmet species so you understand the stages to watch for — and more importantly, what's normal versus what's a problem.
This timeline covers the full journey from grain spawn inoculation through harvest. If you're growing from a grow kit, you can skip ahead to the fruiting section — most of the colonization work has been done for you.
The Three Species
We're tracking three species through their full lifecycle:
- Oyster Mushrooms (Blue Oyster) — the fastest and most forgiving
- Shiitake — the patient grower's reward
- Lion's Mane — unique and increasingly popular
All timelines assume:
- Inoculation from liquid culture or agar into grain spawn
- Colonization at 21-24°C (70-75°F)
- Fruiting in a monotub, Martha tent, or similar fruiting chamber with a hygrometer to track conditions
- Reasonable sterile technique (working in a SAB or flow hood)
The ranges here line up with the standard cultivation reference — Paul Stamets' Growing Gourmet and Medicinal Mushrooms (3rd ed., Ten Speed Press, 2000) — adjusted for what we actually see in home grows and at our own Brantford production facility.
Phase 1: Grain Spawn Colonization
This phase begins when you inoculate your sterilized grain and ends when the grain jar is fully colonized — every kernel covered in white mycelium.
Week 1: Inoculation and Early Growth
What you did: Inoculated sterilized grain jars or bags with liquid culture, agar wedge, or grain-to-grain transfer.
What you see:
- Days 1-3: Nothing visible. The living mycelium is resuming growth from the liquid culture or establishing from the agar wedge. This is completely normal. Do not assume failure at this stage.
- Days 4-7: Small white spots appear at the inoculation points. These are tiny — sometimes just a thin ring of white around a single grain. You might need to look closely.
What's normal: No visible growth for the first 3-5 days. Some species and some cultures take longer to establish. Temperature has a major effect here — at 18°C (64°F), you might not see anything for a full week.
What's concerning: Green, blue-green, or black spots appearing within the first week usually mean contamination entered during inoculation. Review your sterile technique.
Species differences:
- Oyster: Often shows visible growth by day 3-4. Oyster mycelium is aggressive.
- Shiitake: Slower to start. May not show visible growth until day 5-7.
- Lion's Mane: Moderate. Usually visible by day 4-6. Lion's mane mycelium is wispy and can be harder to spot initially.
Week 2: Visible Colonization
What you see: White mycelium is now clearly spreading outward from each inoculation point. The patches grow visibly day by day.
Action item — The Break and Shake: When your jar reaches approximately 30% colonization, shake it vigorously to break up the colonized grain and redistribute it throughout the jar. This dramatically speeds up the remaining colonization. See our spawn making guide for details.
What's normal: Colonization speed varies between inoculation points in the same jar. Some spots grow faster than others — this is genetic variation, not a problem.
What's concerning: Large uncolonized zones that aren't progressing at all, especially if the grain in those areas looks wet, slimy, or discolored. This may indicate bacterial contamination (wet spot) in that section of the jar.
Species differences:
- Oyster: 40-60% colonized by end of week 2. After a break and shake, oyster can finish in days.
- Shiitake: 20-35% colonized. Shiitake is noticeably slower but steady.
- Lion's Mane: 25-40% colonized. Moderate pace, wispy white growth.
Weeks 3-4: Full Colonization
What you see: The jar approaches or reaches full colonization — every grain covered in white mycelium. The entire jar looks like a solid white mass.
What's normal: Some small patches of uncolonized grain visible through the glass, especially in the centre of the jar where you can't see well. Give it a few extra days (consolidation) after the surface looks fully colonized.
What's concerning: Large areas that remain uncolonized after 4 weeks (for oyster) or 6 weeks (for shiitake). This may indicate temperatures are too low, the culture was weak, or contamination is blocking growth.
Species differences:
- Oyster: Fully colonized by week 2-3. Ready for use after a few days of consolidation.
- Shiitake: May take the full 4 weeks or slightly longer. Don't rush it — shiitake benefits from thorough colonization.
- Lion's Mane: Typically fully colonized by week 3-4. The mycelium has a distinctive fluffy appearance.
Mycelium Growth Day by Day
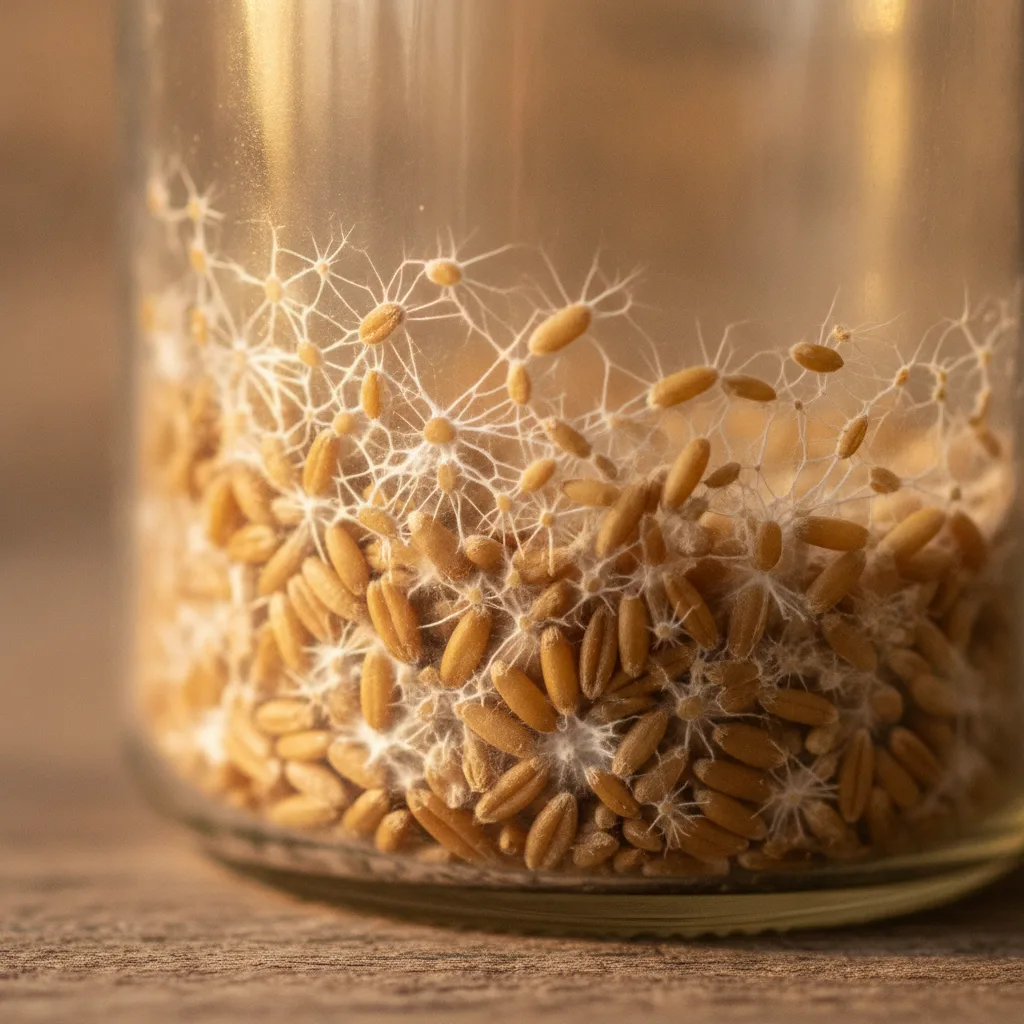
The week-by-week view above tells you where the jar should be — but the question we actually get most is "is this normal?", usually attached to a photo of a grain jar on day 6. So here's the close-up version: what the inside of the jar really looks like each day as the mycelium works through the grain, and how to tell healthy growth from trouble at a glance.
Days 1-3 (establishing growth): Almost nothing to see, and that's fine. The culture is waking up and pushing its first microscopic hyphae into the grain. You might spot a faint white haze at the inoculation points, or nothing at all — both are normal, and so is condensation on the glass. Resist the urge to open the jar to check; nothing you can see on day 2 tells you anything useful yet.
Days 4-10 (web expansion): This is when it gets fun. Fine white threads radiate outward from each inoculation point, hopping kernel to kernel until each point becomes a fuzzy white patch the size of a loonie, then a golf ball. Healthy mycelium at this stage is bright white and cottony, with a leading edge that advances a little every day — mark it on the glass and a healthy jar will beat the line by the next evening.
Days 10-21 (consolidation): The separate patches merge into one continuous white web, then the web thickens into a solid mat. Somewhere in this window — around 30-50% coverage — is your moment to break and shake, redistributing colonized grain so the last stretch goes faster. After the shake the jar looks patchy again for a few days, then whites out from every direction at once. When the sides are solid white, give the hidden centre a few extra days to catch up before you call it done.
Take dated photos through the closed container to compare progress. White growth alone cannot prove a bag is healthy. If growth stalls, check temperature and the culture supplier’s guidance before changing conditions. Keep bags with suspicious spreading patches apart from other grows and read the green mould guide.
How Long Do Grain Jars Take to Colonize?
A standard quart jar at 21-24°C takes 2-4 weeks to fully colonize — oyster species at the fast end, lion's mane in the middle, shiitake at the slow end, exactly as the summary table above lays out. Three things move that number most. Temperature is the big one: a few degrees below room temperature can double your wait, so check our temperature guide if jars are dragging. Second is inoculation rate — more inoculation points and a proper spawn ratio mean less distance for the mycelium to travel. Third is what you started from: grain-to-grain transfers establish fastest, agar wedges close behind, spores slowest. For reference, a fresh Lion's Mane Liquid Culture syringe into warm grain typically shows its first visible growth in 3-6 days.
Phase 2: Bulk Substrate Colonization
This phase begins when you mix your colonized grain spawn into bulk substrate and ends when the substrate is fully colonized and ready for fruiting conditions.
After the grain is ready: mix it into the final substrate
What you did: Mixed colonized grain spawn into prepared growing material suitable for the species: for example, straw for many oysters or hardwood-based substrate for Lion’s Mane and shiitake. Use a container and method designed for that mushroom. A monotub is not the right format for every species.
What you see:
- Days 1-3: Individual grains are visible in the substrate, but no mycelial growth is visible between them yet.
- Days 3-5: White spots appear around each grain, spreading into the surrounding substrate. Each grain becomes a little node of growth.
- Days 5-10: Growth nodes merge. The surface starts to look like a white patchwork quilt as mycelium fills the gaps between grain points.
What's normal: Uneven growth. Some areas colonize faster than others based on spawn distribution, moisture variation, and temperature gradients in the tub.
What's concerning: Green mold (Trichoderma) appearing during this phase. Trich on an uncolonized substrate is a death sentence for the batch — the mushroom mycelium can't compete.
Species differences:
- Oyster: Surface colonization in 7-10 days. Oyster is by far the fastest bulk colonizer.
- Shiitake: Several weeks for the block, followed by the strain’s maturation and browning stage.
- Lion's Mane: Often several weeks; its thin mycelium can be hard to judge through a bag.
Over the following weeks: growth fills the block
What you see: The entire substrate surface is covered in white mycelium. The substrate has a uniform white appearance when viewed from above. Through the clear tub walls, you can see mycelium penetrating several centimetres deep.
What to check: Some species change colour as their blocks mature. Colour alone does not prove health or contamination. Small dense bumps may be early mushrooms; compare dated photos and the supplier’s guidance before disturbing them.
When to move to fruiting: Wait until the block has grown through and reached the maturity required by the strain’s instructions. Do not open a partly colonized block simply to meet a date. Shiitake also needs its browning and maturation stage.
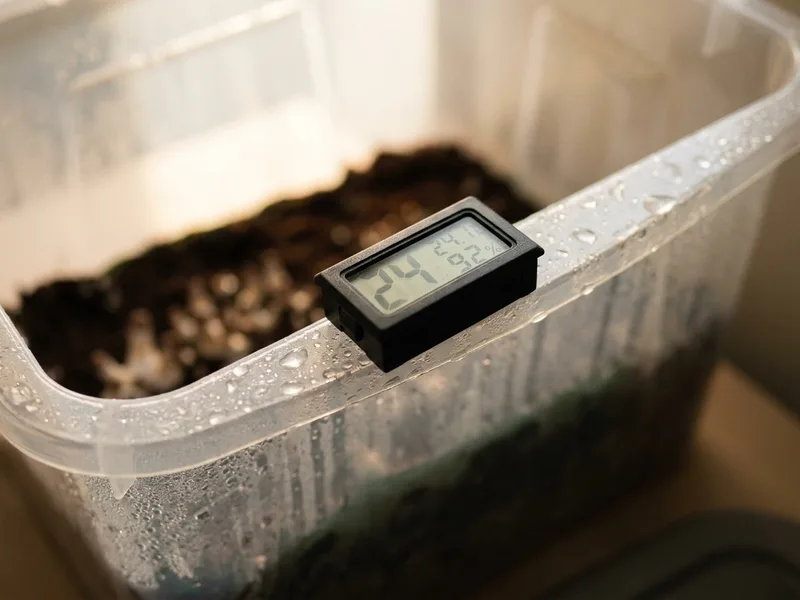
TempPro TP50 Digital Hygrometer & Thermometer
Knowing your exact temperature and humidity takes the guesswork out of troubleshooting slow colonization and pinning issues. The max/min records show you what happened overnight.
When you buy through our links, it supports our mycology research at no extra cost to you.
Phase 3: Fruiting
This phase begins when you introduce fruiting conditions (fresh air, light, temperature change) and ends at harvest.
Once the block is mature: first tiny mushrooms
What you did: Introduced fruiting conditions — increased fresh air exchange, added a 12/12 light cycle, possibly dropped temperature slightly. For a monotub, this means adjusting the lid or polyfill. For a Martha tent, adjusting humidifier and fan settings.
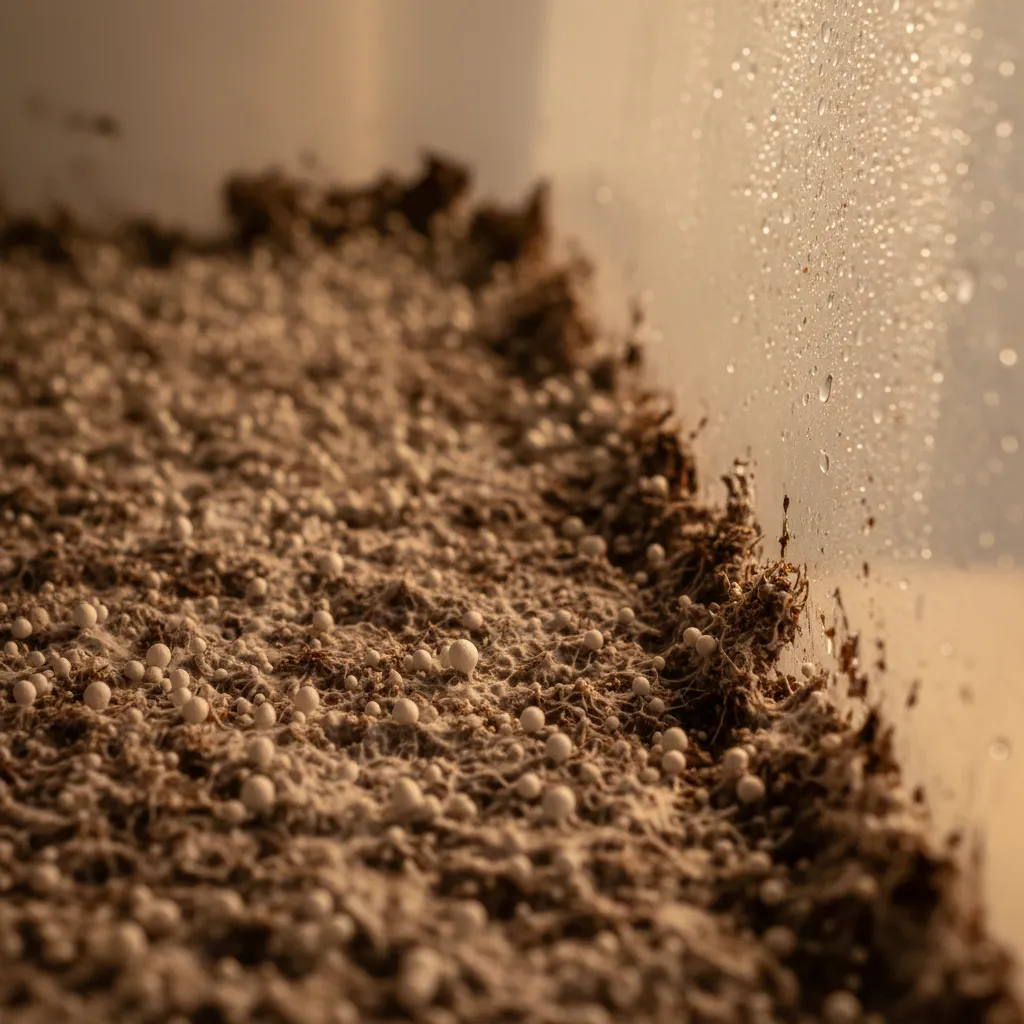
What you see: At first there may be little visible change. Then tiny mushrooms appear at the growing opening. The wait depends on the species, strain and block preparation; Nature Lion kit timing is listed separately below.
What's normal: Pins forming unevenly — more in some areas than others. Clustering near fresh air sources (holes, gaps in the lid) is common because the local CO2 is lower there.
What to check: If the block is beyond the supplier’s expected range, review its opening, temperature, moisture and fresh-air routine. For a Nature Lion kit, use the not-growing checklist. For homemade grows, check your temperature and humidity readings before making several changes at once.
Species differences: Oyster pins develop tiny caps; Lion’s Mane starts as small white growth that later develops hanging teeth. Shiitake preparation depends on the mature block’s instructions. Do not apply a generic cold-shock or soaking routine to all three.
After pins appear: growth and harvest
What you see: Pins develop rapidly into mature mushrooms. Growth is visible day by day — often hour by hour in the case of oyster mushrooms.
Harvest timing by species:
Oyster mushrooms: Harvest when the cap edges are still slightly curled or just flattening. From pin to harvest is typically 5-7 days in optimal conditions. Don't wait for the caps to fully flatten and upturn — by that point, the mushroom is past peak and dropping spores heavily.
Oyster mushrooms are the fastest from pin to harvest. In warm conditions with good humidity, Blue Oyster can go from visible pin to harvestable cluster in 4-5 days. Pink Oyster is even faster — sometimes 3-4 days.
Shiitake: Harvest when the cap is 70-80% open, with the edges still slightly curled inward. From pin to harvest is 7-14 days. Shiitake develops slowly compared to oyster but the flavour and texture are worth the wait. The cap should feel firm and meaty when pressed.
Lion's Mane: Harvest when the spines (teeth) are 6–12 mm long and the body is still white and firm. Before the edges start to yellow or brown. From pin to harvest is 7-10 days. Lion's mane looks like a white, fluffy snowball or waterfall of spines. It grows as a single mass rather than a cluster of caps.

Free tool
Build Your Grow
Tell it where you're starting and it sizes the whole grow: how much spawn, how much substrate, how many containers, the expected harvest and what it works out to per pound.
- I have grain spawnSize the substrate and containers around it
- I'm starting from liquid cultureWork out the grain, then the fruiting plan
- I'm starting from agarPlates to grain to substrate, in order
Live store pricing. Free shipping on orders over $50. Or start from a pre-built bundle.
Summary Timeline Table
Each row starts at the beginning of that stage. Do not read these as fixed weeks from one universal “day one”; actual stages can be shorter or longer depending on the strain and method.
| Stage | Oyster | Lion’s Mane | Shiitake |
|---|---|---|---|
| Growing through grain | Often about 2–3 weeks | Often about 3–4 weeks | Often about 4–5 weeks |
| Growing through the final substrate | Commonly another couple of weeks | Commonly several more weeks | Several weeks, followed by maturation and browning |
| Ready to produce mushrooms | Follow the strain’s opening and room requirements | Provide suitable moisture and fresh air | Start only when the supplier’s maturity signs are met |
| Harvest | Cap edges still curve slightly downward | Firm white cluster with teeth about 6–12 mm | Opened caps with rims still curled underneath |
A purchased kit skips grain and block preparation. Use the kit timeline below for Nature Lion’s first-sprout ranges.
Bulk Substrate Colonization Time by Species
Bulk colonization is the phase growers ask about most, because it's the longest stretch where "nothing" appears to happen. Here's what to expect across the species we see most often, assuming a healthy spawn rate (1:2 to 1:4) and temperatures in each species' comfort zone:
| Species | Grain colonization | Bulk substrate colonization | Notes |
|---|---|---|---|
| Blue oyster | 2-3 weeks | 10-14 days | The sprinter — visible progress daily |
| Pink oyster | 1.5-2 weeks | 7-10 days | Fastest of all in warmth (24-30°C), stalls below 18°C |
| King oyster | 2-3 weeks | 14-18 days | Slower, denser mat than other oysters |
| Golden oyster | 2 weeks | 10-14 days | Similar to pink; loves warmth |
| Lion's mane | 3-4 weeks | 14-21 days | Wispy, faint mycelium — looks weaker than it is |
| Shiitake | 4-5 weeks | 3-6 weeks + browning | Needs an extra browning phase before fruiting |
| Black pearl oyster | 2-3 weeks | 12-16 days | Hybrid vigour; like a slightly slower blue oyster |
| Reishi | 2-3 weeks | 14-21 days | Thick white mat, then slow antler development |
Temperature, spawn rate, starting material and strain all change timing. Use the table to understand the order of stages, then compare progress with the method you chose. Read the spawn ratio guide to understand how the amount of starter is measured.
What Affects Speed?
Temperature
Temperature is the single biggest factor in colonization and fruiting speed. Within the safe range for each species:
- Every degree warmer (up to the species' maximum) noticeably speeds colonization. Oyster mycelium at 27°C (80°F) colonizes nearly twice as fast as at 18°C (64°F).
- But warmer isn't always better. Higher temperatures also favour contamination. The sweet spot of 21-24°C (70-75°F) balances speed with safety.
- Fruiting temperatures are species-specific. Check our temperature guide for optimal fruiting ranges.
Spawn Rate
Higher spawn rates (more grain spawn per unit of substrate) mean faster colonization. A 1:2 spawn-to-substrate ratio colonizes roughly twice as fast as 1:4. This isn't just grower lore — a published oyster-mushroom trial found that raising the spawn rate from 1.25% to 5% of substrate wet weight cut time-to-production by an average of 9.2 days (Royse, Applied Microbiology and Biotechnology, 2002). For speed, use more spawn.
Spawn Generation
Fresh spawn from agar or liquid culture (G1) tends to colonize more vigorously than spawn that's been through multiple grain-to-grain transfers. If your colonization seems slow, check your spawn generation.
Genetics
Some strains within a species are simply faster than others. If you're cloning your fastest-colonizing fruits and selecting for speed, you'll see meaningful improvement over time.
Substrate
Some substrates colonize faster than others. Straw colonizes faster than hardwood sawdust for oyster mushrooms. Use hardwood-based growing material for the wood-loving mushrooms in this guide rather than treating all substrate recipes as interchangeable. Check our substrate guide for details.
How to Know If Something Is Wrong
No growth after 10 days on grain: The culture may be dead, or temperatures are too low. Try moving to a warmer location (24-27°C / 75-80°F). If nothing after 3 weeks, start over.
Growth stalled at 50-70% on grain: Shake the jar to redistribute colonized grain. If growth doesn't resume within a week, there may be a contamination pocket blocking progress.
Surface colonization stopped on bulk: Temperature drop? Substrate too dry? Check both. Surface dryness can halt mycelial advance. A light mist of the surface (not soaking) may restart growth.
Pins forming but not maturing: Humidity is likely fluctuating. Developing mushrooms are very sensitive to changes in relative humidity. Maintain consistent 85-95% RH during fruiting. Also check for temperature swings.
Everything is growing but taking twice as long as expected: Check temperature first. Then check your spawn — old or weak spawn from too many transfers will colonize slowly. Consider starting with fresh cultures or spawn.
Grow Kit Timeline (Shortcut)
A Nature Lion boxed kit already contains a prepared block. Count from when you open it and begin daily care:
| Stage | What to expect or do |
|---|---|
| Opening day | Open the back window, cut the X, gently scrape the exposed surface and mist beneath the attached flaps |
| Waiting for oysters | First sprouts usually appear in 1–3 weeks |
| Waiting for chestnuts | First sprouts usually appear in 4–6 weeks, averaging 4–5 weeks |
| Waiting for Lion’s Mane | Watch for small white growth; maintain the included slit humidity tent |
| Mushrooms developing | Check daily and avoid scraping or soaking the growing cluster |
| Harvest | Follow cap shape or tooth development, not a fixed day |
| Preparing the next Nature Lion crop | Rest about one week, soak for eight hours and check the drained block reaches about 3–3.5 lb |
For the opening and daily care, use the kit stages guide. The harvest guide explains exactly when and how to pick. The second-harvest guide explains what to do if the first soak has not rehydrated the block.
Other makers may use different preparation and schedules. Keep their instructions beside the kit. A dated photo on your phone or in an optional grow diary makes changes easier to see.
Fruiting happens in whatever chamber you have built: a monotub for bulk substrate, or a shotgun fruiting chamber for cakes.
If you are still deciding which method to start with rather than timing one you have begun, start with the guide to growing mushrooms.
Frequently Asked Questions
How long does bulk substrate take to colonize?
For most species, expect 10 to 21 days for bulk substrate to fully colonize at a 1:2 spawn-to-substrate ratio and room temperature around 21-24°C. Fast species like pink and blue oysters can finish in 7 to 14 days, while lion's mane and reishi typically need 14 to 21 days. Shiitake is the outlier — 3 to 6 weeks, plus a browning phase before it will fruit. If your substrate shows no visible spread after 7 days, check the temperature first; a cold room is the most common cause of a stalled colonization.
How fast can mushrooms actually grow?
Once tiny mushrooms appear, they can change noticeably from one day to the next. That is why harvest checks should be daily. For Nature Lion kits, allow 1–3 weeks for oyster sprouts and 4–6 weeks for chestnut sprouts; those ranges are for first growth, not a finished harvest.
How long does grain spawn take to colonize?
Grain spawn typically takes 2 to 4 weeks to fully colonize, depending on species and temperature. Oysters finish in about 2 to 3 weeks, lion's mane in 3 to 4, and shiitake in 4 to 5. Shaking the jar or bag once at around 30% colonization redistributes the mycelium and can shave several days off the total. Using ready-made grain spawn skips this phase entirely and takes 2 to 4 weeks off your timeline.
Why is my grow slower than the timeline says?
Check the actual room temperature against your strain or kit instructions. Starting material, moisture and spawn amount can also affect progress. Slow growth alone does not prove failure or health. If a kit is beyond its expected sprouting range, send the maker dated photos before repeatedly changing the routine.
Which mushroom is fastest to grow for a beginner?
Pink oyster is the fastest — grain colonization in 1.5 to 2 weeks, bulk in 7 to 10 days, and pins to harvest in under a week. Blue oyster is a close second and more forgiving of cooler rooms. Both are aggressive colonizers that outrun most contamination, which is exactly what you want on a first grow.
Need help with a Nature Lion kit? Start with the kit care guide, or email info@naturelion.ca with a photo and your start date. Dr. MycoTek is another option for growing questions and notes.